[January Update - the
third vacumatic is complete. It's been given away on the Fountain Pen
Network's Pay it Forward thread,now that it is fully tested. Scroll down
past the video for a few photographs from the build process.]
I've used the parts I have left to modify a 3rd 616 Jumbo, the completed pen will be given away as a "Pay It Forward" on FPN.
At last, the filler unit
is complete, the barrel is cut apart, the blind cap lip has been bored
out, the diaphragm is attached to to the filler rod's pellet holder, the
filler unit is sealed in the barrel and the blind cap threaded insert
is installed.
The pen is complete, the barrel tested for leakage, the nib dip tested for smoothness, and the completed pen fill tested - average maximum capacity is between 1.6 and 1.7ml.
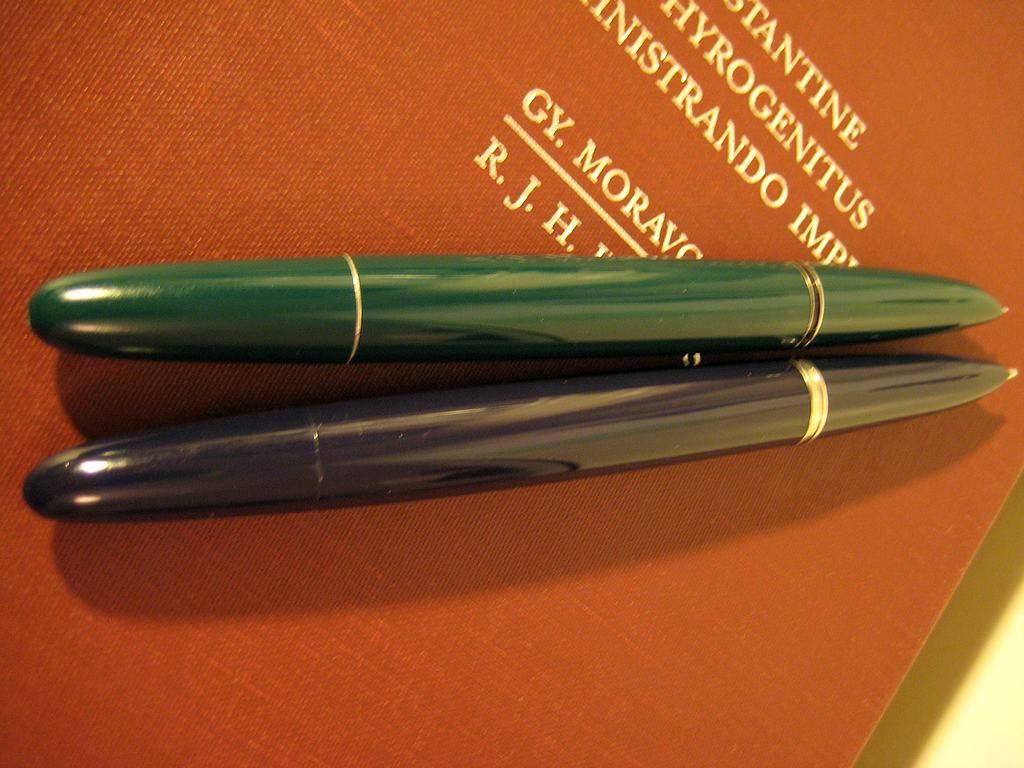
Here's a couple of fresh photos of the finished pen, next to a 1948 Parker 51 for comparison.
From top to bottom: the vacumatic Hero 616, and a vacumatic Parker 51.
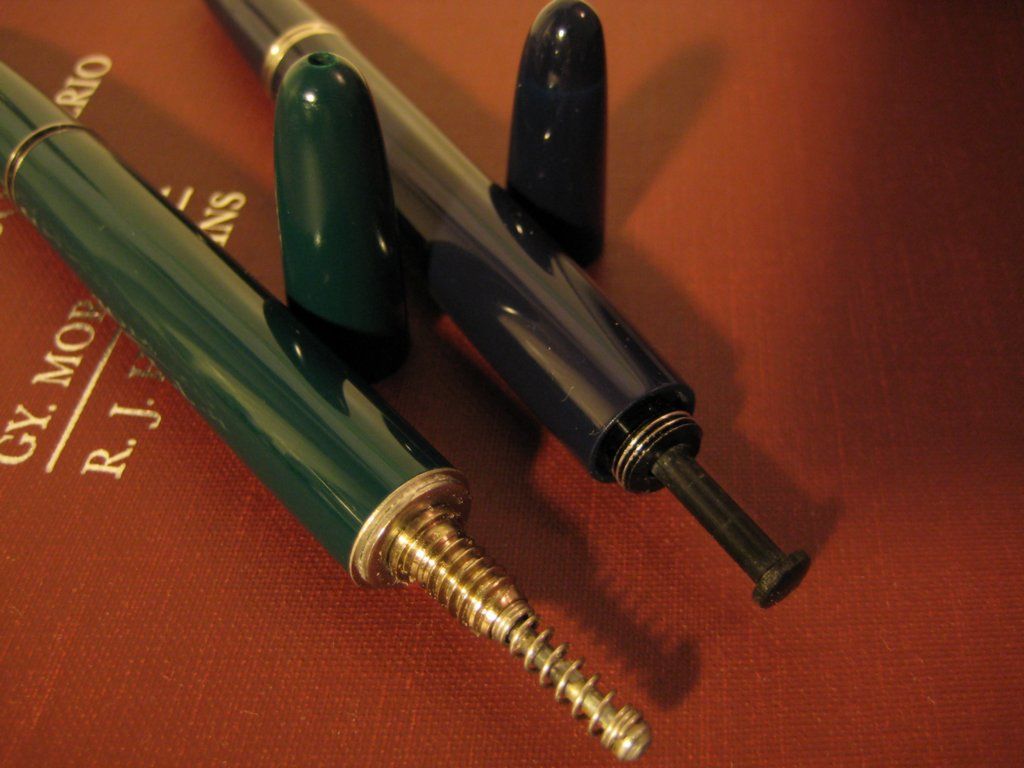
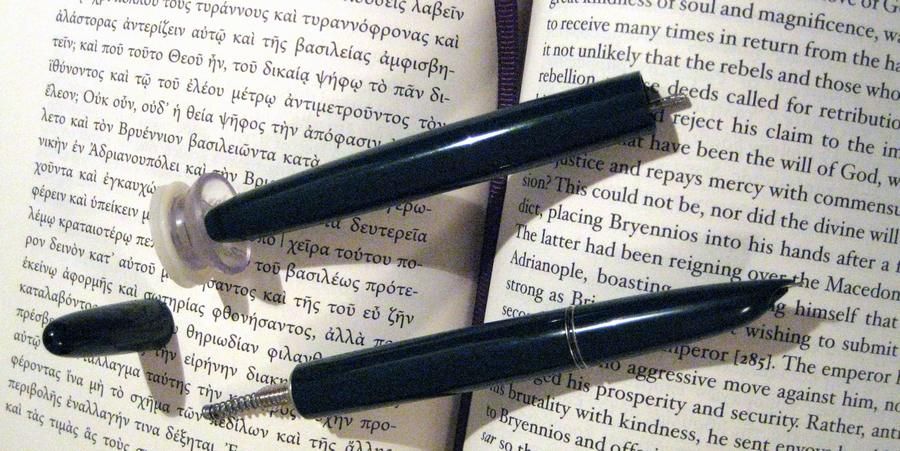
Blind caps removed, and filler units exposed.
As well as the filler swap, the tines have been spread apart slightly
to make the ink flow more generous, then aligned with one another, and the nib and feed
have been aligned straight with the hood. The nib has been smoothed with
micromesh, a brown paper bag and a wet mirror.
The PIF barrel on the improvised cutting spindle. The blind cap on the mark 2 is kept stealthy, with no visible trim ring. The mark 3 gets a trim ring taken from the old button filler 616.
As with the Mk2, the Mk 3 gets an
alteration to the internal filler. Instead of being mounted on an
oversize washer with a rubber sleeve taking up the slack, an undersize
washer is first slightly bored out, then hammered into place with a
hollow drift. The friction fit between the two is very strong.
The barrel washer, about to be fitted to the filler housing.
As the irregularity of this barrel was quite severe compared with the others, I opted not to go for a stealthy blind cap. For strength and durability, I first superglued a 616 trim ring to the filler housing's washer, then sealed it to the barrel, so that the entire available surface area was sealed to the filler.
Once exposed, I found the Mk.3's barrel wall thickness (on the right) was very eccentric, so chose to have the filler housing in contact with the entire available surface area.
A completed vacumatic filler, with the blind cap in background. The blind cap lip is bored to accept the filler housing washer.
With the filler installed, the blind cap is held in decent alignment till the sealant sets.
Friday's (day 3) went the same as yesterday's session; rather a trial. Today my hands are super cold and there is no way in Hades I'm plunging them in an ice bath. I'm having a glass or 2 of vino (as a vasodilator) instead.
Today's was my second session attempting the cold hands cure over at the backcountry skiing blog.
Day 2 - sunny, high of 3, low of -3 degrees Celsius.
Hmm. This was quite different to yesterday's experience, being uniformly unpleasant from start to finish with no noticable change in sensation after the first few alternations. I did notice that 1 hour afterwards, I experienced a glowing feeling within the hands for a while, palm and fingers warm to the face, back of the hand colder. They were quite clumsy for a while, including during the glowing feeling.
Anyway onwards and upwards. 2 days down, 12 to go!
For the next fortnight, I'll be attempting a cold hands cure, as detailed on the backcountry skiing blog. Winter is here and I am just royally fed up with my hands being cold while the rest of me is warm. From what I've read, the idea is to have one bowl of hot water, one bowl of ice water, and alternately submerge the hands in each long enough to shock the blood vessels in there to pump blood during the winter already!
Day 1 - A clear day, ground frost, high of 0, low of -1 degrees Celsius.
Off we go. Here's a big metal bowl of ice topped up with water, and here's a big plastic bowl of hot water with a kettle standing by to top up when it cools. The ice water is very hard going the first couple of times, but toward the end of the session (when all my ice trays were used up) I did notice I could keep my hands in the ice water comfortably for much longer before the old sharply unbearable feeling appeared. It was an interesting process and change in sensations. I'm going into this with an open mind, it is a shame I haven't some sort of heat sensing camera to record any change day by day. Hopefully, by blogging each day's effort, I'll force myself to keep at it for at least a fortnight!
A bit of background info:
Now, everyone gets colder hands when the weather turns. I'm not saying I have to bring a can of antifreeze when I walk out the front door, I just feel mine are overreacting for the conditions compared to most people's. In normal outdoor winter conditions, wearing sensible attire, they function fine, but are cold enough to hurt my face if I touch it. Wearing a metal wristwatch bracelet soon makes the joint painful.
A further comparison: I played rugby (compulsorily) for most of my school years. Every time I stepped on the pitch, my hands would stop working within 15-20 minutes, guaranteed, every time. First they would ache, then turn white, then lose all strength and most sensation. There was some articulation in the wrists, but the fingers simply would not move. After a scrum or tackle, I noticed the skin on my hands had lost elasticity and would be quite torn up.
Even after a hot shower, there was not enough response to button a shirt or tie a shoelace. Normal function would return approximately 1 to 1.5 hours after dressing, if memory serves - I would either be on the bus home or almost at my door. The point is, the only time I ever saw anyone else with the same issue (hands cold past the point of movement or sensation) was after games in almost blizzard conditions.
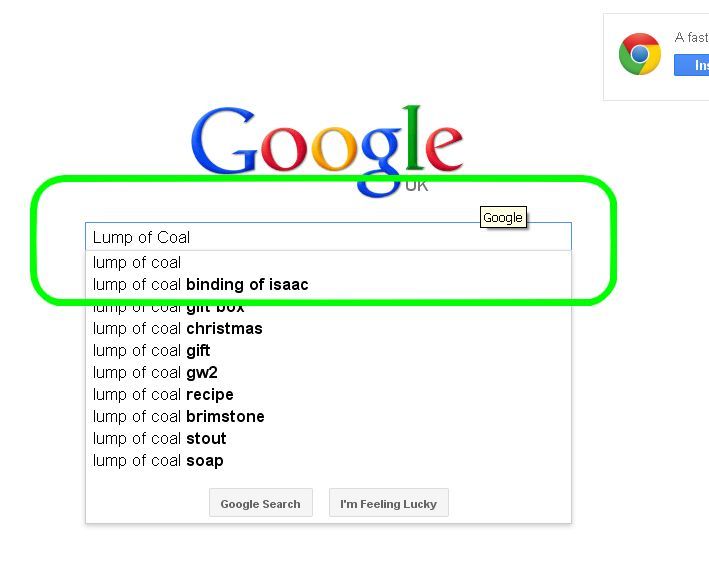
Now that Christmas is looming, google's minor irritation of changing the whereabouts of the "Show pages from the UK" button becomes a full blown annoyance. If you're doing your Christmas shopping now, you hardly want to gamble that presents will make it in time shipping in from Guatamala.
Here's the quick fix. What used to be a simple one click radio button is now a four step neopainism.
[click to zoom all photos]
1st, type out your search term:
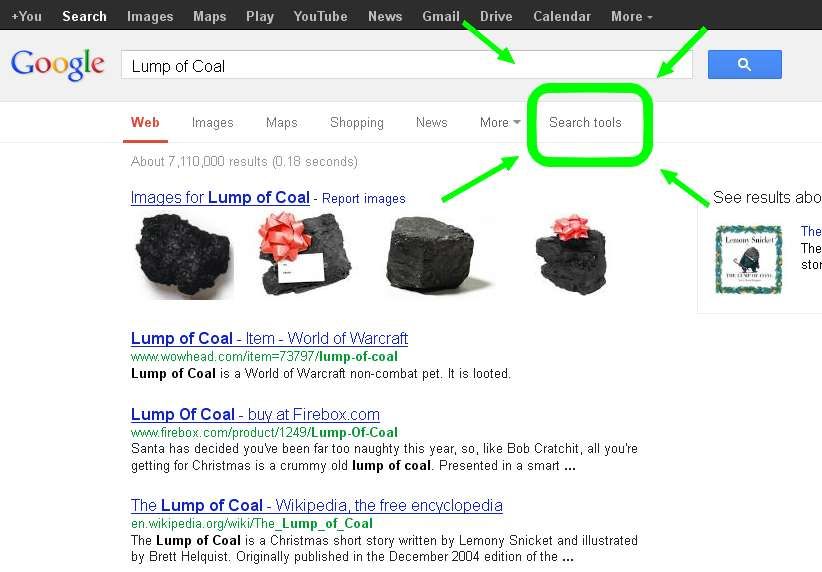
2nd, click the "Search tools" option.
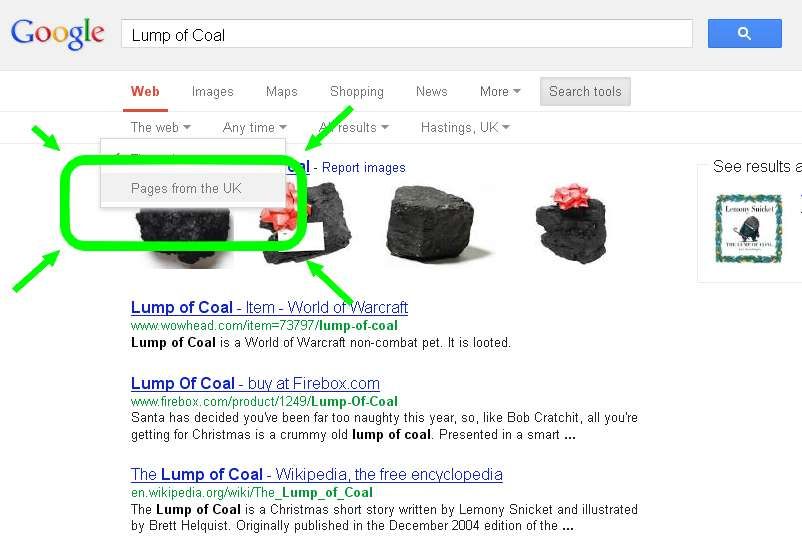
3rd, choose "the web" pulldown (how staggeringly disingenuous!).
4th, choose "Pages from the UK".
Happy hunting, happy holidays, and remember, "possessions are fleeting".
Casting my mind back to a inky black Scottish night, a myopic twelve year old self is trying to train a heavy and ancient pair of binoculars on Rigel, after using the belt of Orion to get his bearings. He's given up on squinting really hard at the blackness around Sirius A for a glimpse of its faint twin. He knows this is an impossibility, but nevertheless, maybe tonight...
Eventually, my interest in astronomy tailed off, along with an alarmingly thorough loss of nearly everything I learnt along the way. One thing stayed as fixed as those stars (which I have had to look up on google's Sky Map app to now locate); a warm affection for the Sky at Night, and specifically its presenter Sir Patrick Moore, in whom that twelve year old self had noted a new category of adult educator, whose authority is not inferred from bellowing orders, but rather an affable and infectious enthusiasm for the subject at hand.
So it was with great fondness I watched the Sky at Night on BBC4 on Thursday night, and with a twelve year old's pang of unreserved despair read today of Sir Patrick Moore's passing. What dignity he had in the face of the ill health of advancing years. What tireless dedication to his field, presenting the cosmos to our television screens pretty much continuously since the 1950's - a true amateur in the old sense of the word. What a loss.
One of the reasons I harp on so relentlessly about the humble Hero 616 jumbo is this; it's very much an "enabling" pen. It has drawn me in to the wellspring of fountain pen lore well beyond the original "these are very easy on the wrist, could be handy for yet another week of three hour handwritten essay exams" rationale.
This inexpensive, mass produced plastic cigar has helped me learn about nib smoothing, tine alignment & flow adjustment, cap assembly, ink sac types and their properties, button filler mechanisms, vacumatics, aeromatics, collector, nib, feed and hood alignment - far more than could be reasonably expected of it. I probably owe my serendipitously disaster free resurrection of older pens (so far...) to the 616.
This post concerns a common "characteristic" of 616 jumbos - straight from the blister package, the nib can be off centre from the hood. This is purely a cosmetic concern, and they will still write without tweaking. You only need to start tinkering if the nib not being straight plain bugs you, or you temporarily want better access to the nib for smoothing, aligning the tines, or changing the rate of ink flow.
Bifurcation time! There are 2 paths to take here, depending on how the pen was put together at the factory, greased or sealed:
My most recent batch were stamped 2012, and their hoods are sealed on strongly. I'm not keen at all on stressing the thin plastic in attempting to get these new pens open. I recommend the safe and simple technique shown in the video below for sealed units.
This technique aligns the nib safely to a sealed 616 jumbo hood, never attempt the same on a Parker 51. I couldn't think of an amusing chiasmus to write here. Any ideas?
The three jumbo 616's I bought last year, on the other hand, had hoods that were made ink-tight with a mere smear of grease on the threads. I recommend the method below for these, as you really are better off with sealant on the hood threads rather than grease. This method is a bit more involved, but does get you some great hands-on experience should you ever need to open a very similar Parker 51.
First, here's the patient (click to zoom all photos). This is assuming a really badly put together pen, with the nib, hood, and feed all over the place, for ease of demonstration. I've never seen one come out of the packet this bad in reality.
Flip the pen over, and it's so bad, the nib is even off centre from its feed (the black bit)
So unscrew the hood to take it off - unlike a vintage Parker 51, there's not much call for dry heat or soaking - and clean the grease off the
threads.
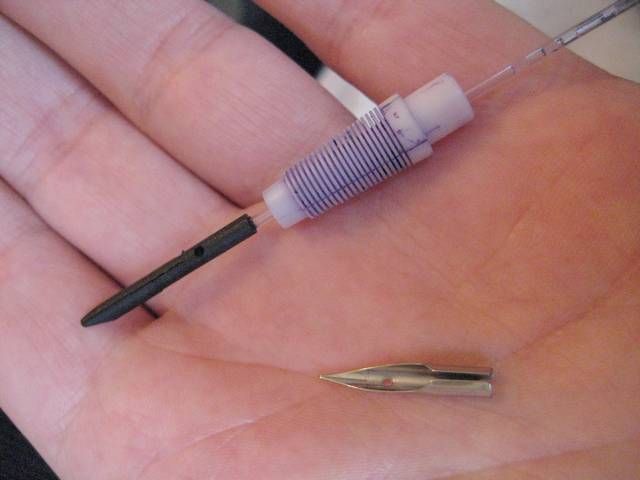
Pull out the white collector!
With a pull and push rhythm, the nib and feed can be pulled out of the collector.
Set the nib and feed straight, then push them straight into the
collector. The feed should face the thin channel in the collector
(though to be honest, judging from my experiments it doesn't really have to).
Leave all that out of the pen, and screw the hood back into place - not crazy-tight, just snug. Make a
mental note of where it stops, or use a bit of tape, or something. Take
the hood off again.
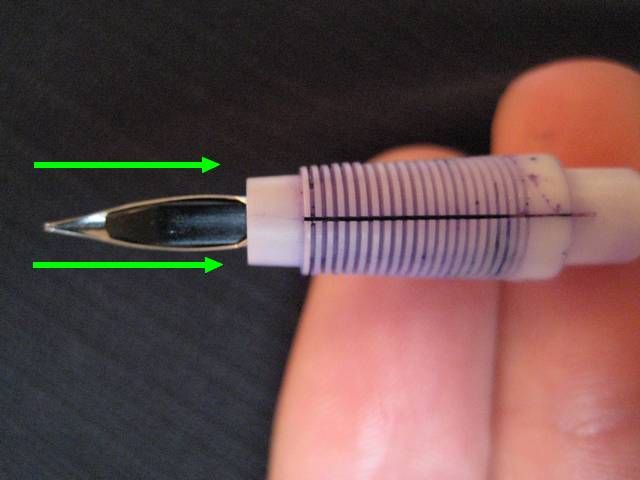
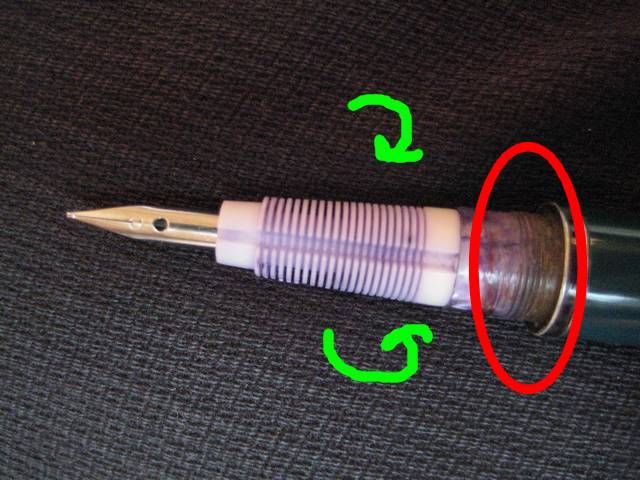
Push the white collector back into the pen, and turn it left or right
till the top of the nib is aligned with the top of the where the hood
was. You can screw the hood back on to double check. Once you are happy
enough, apply sealant (shellac for example) to the threads, circled in red. With
these pens, I'd be generous rather than conservative.
Here's a shortish clip of my second vacumatic Hero 616 jumbo mod. I thought it would be more helpful to put the Mk.3 vacumatic content in a separate post to avoid any confusion, as I'll be giving that pen away.
The differences between the Mk.2 and the first 616 I converted aren't anything major. As part of a cosmetic change, the mark 2 got an
alteration to the internal filler. Instead of being mounted on an
oversize washer with a rubber sleeve taking up the slack, an undersize
washer was first slightly bored out, then hammered into place with a
hollow drift. The friction fit between the two is very strong. Also, a presta valve cap was used in the blind cap,as it threads more nicely than the original woods valve cap for some reason.
The barrel washer, about to be fitted to the filler housing.
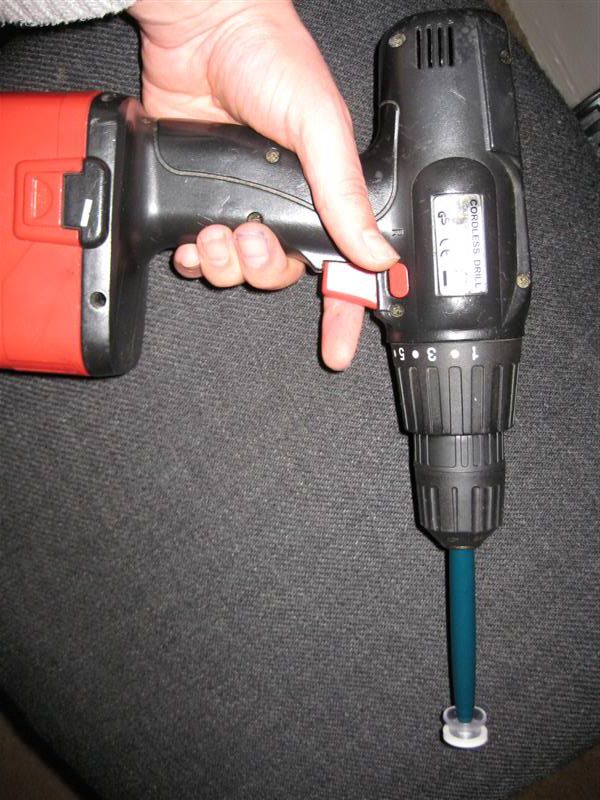
A drill.
For both the Mk2 and 3, I figured out an easy and fast way to cut the blind cap without
sawing it by
hand, a real timesaver. The breather hole in the barrel was widened to
accomodate a long VHS spindle.
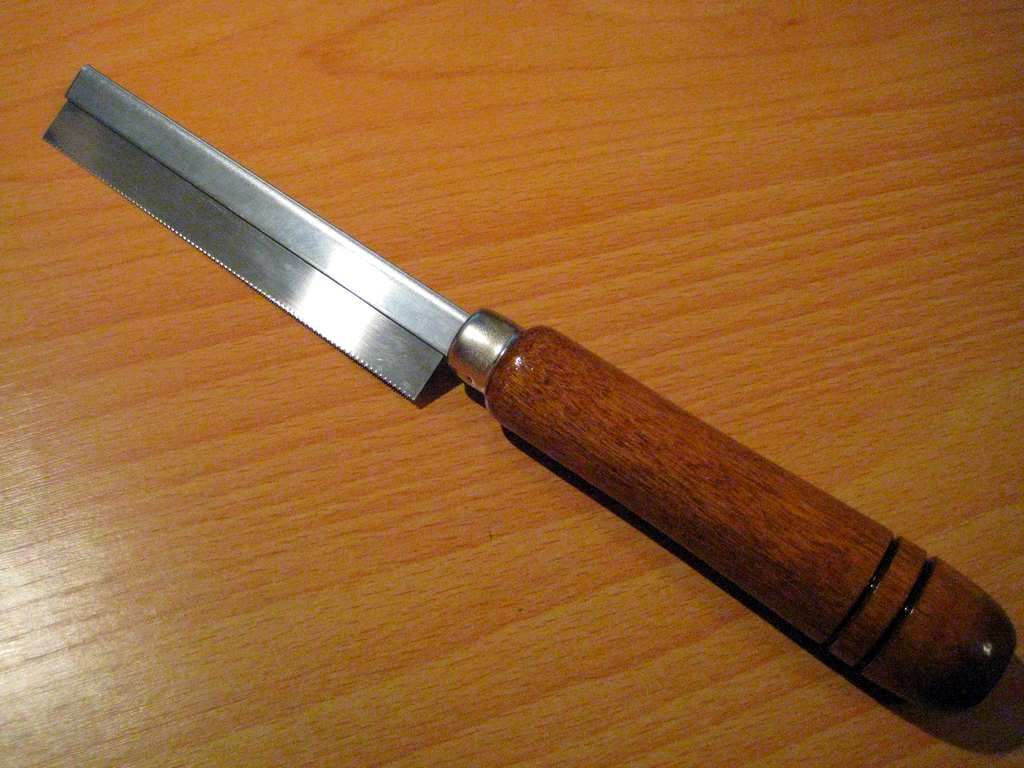
The barrel is held in place between the
spindle and a drill, the area to cut wrapped with masking tape, and spun
fast as a 42tpi craft saw is held against the barrel. The resulting cut is quite neat. If you try this yourself, bear in mind the craft saw teeth cut on on the pull stroke, so set the drill to rotate the barrel against the teeth!
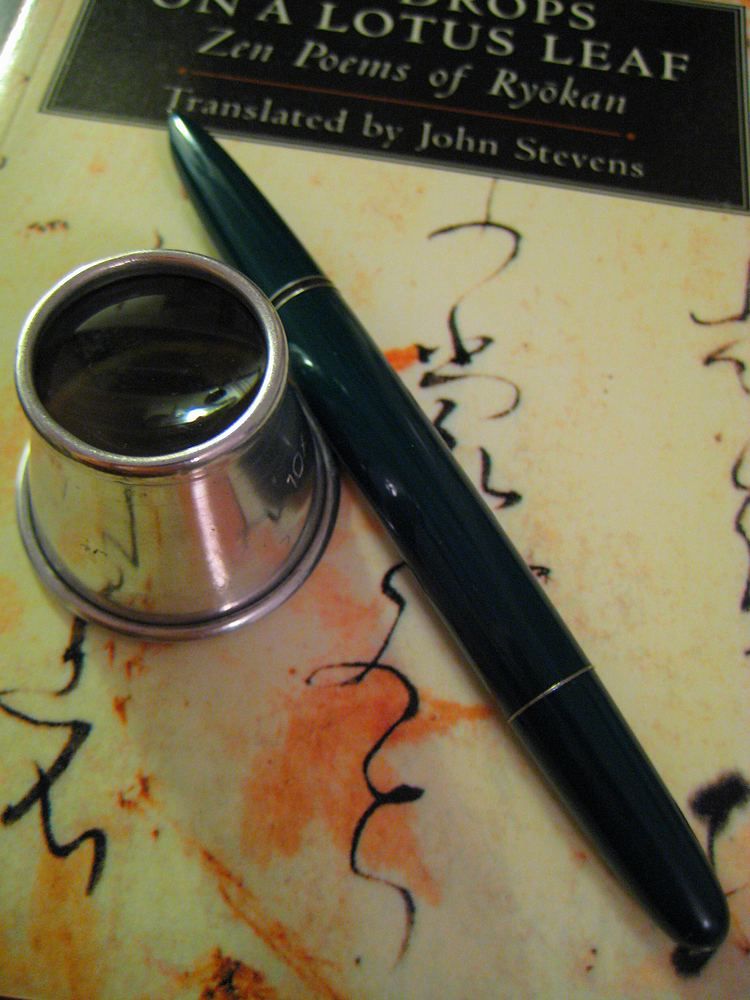
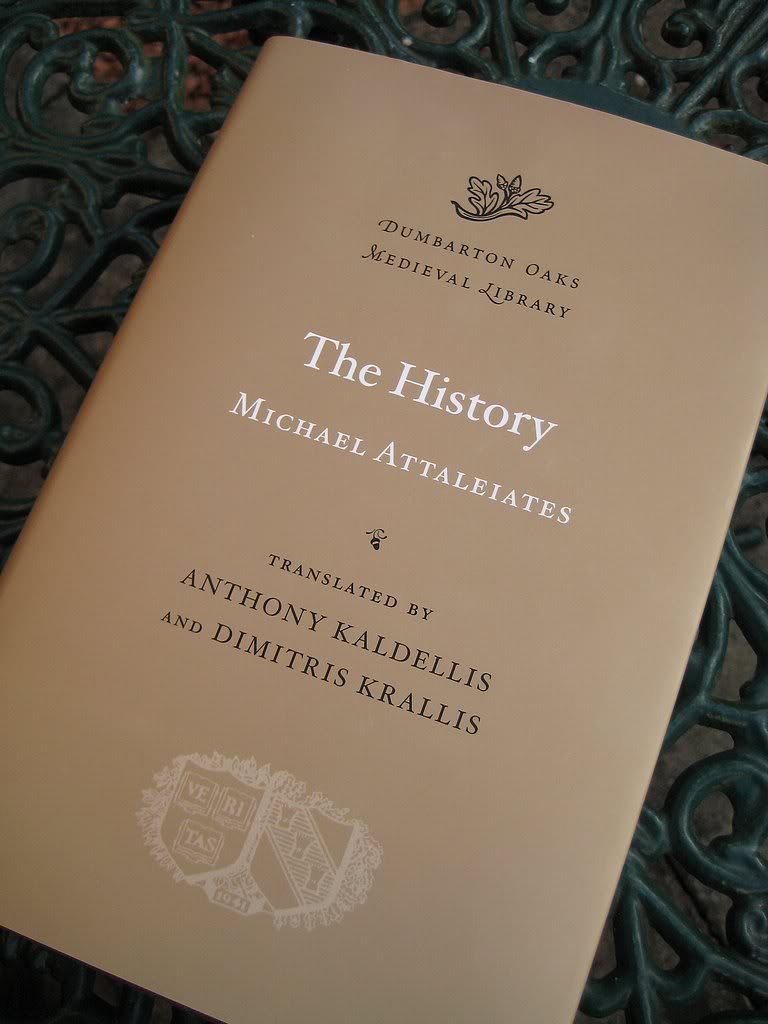
This June, I did something out of character; I pre-ordered a book. I
can't blame this one on somatosensory disruption during the summer's transit of Venus (next due in December 2117); rather, during a habitual search, Amazon surprised me with a result for Michael Attaleiates, the 11th century Byzantine author - the first ever English translation of The History.
I'd noticed Attaleiates fleetingly referred to in a rapidly disintegrating copy of Norwich's excellent primer A Short History of Byzantium, as well as sites dotted around the web; I was especially keen to read his History after Michael Psellos' Fourteen Byzantine Rulers, for a perspective of the perilous situation in the east less sanitised by a scholarly lifetime in the Imperial court.
Unlike Psellos, Attaleiates was a first hand witness to no less than three campaigns, including the disaster at Mantzikert. He writes with a pace that lends a sense of the pandemonium of those years; lofty Atticisms are eschewed for an unflinching and detailed account of the visceral
brutalities of war and civil upheaval - the
shameful blinding of Romanos Diogenes being a notably excruciating passage.
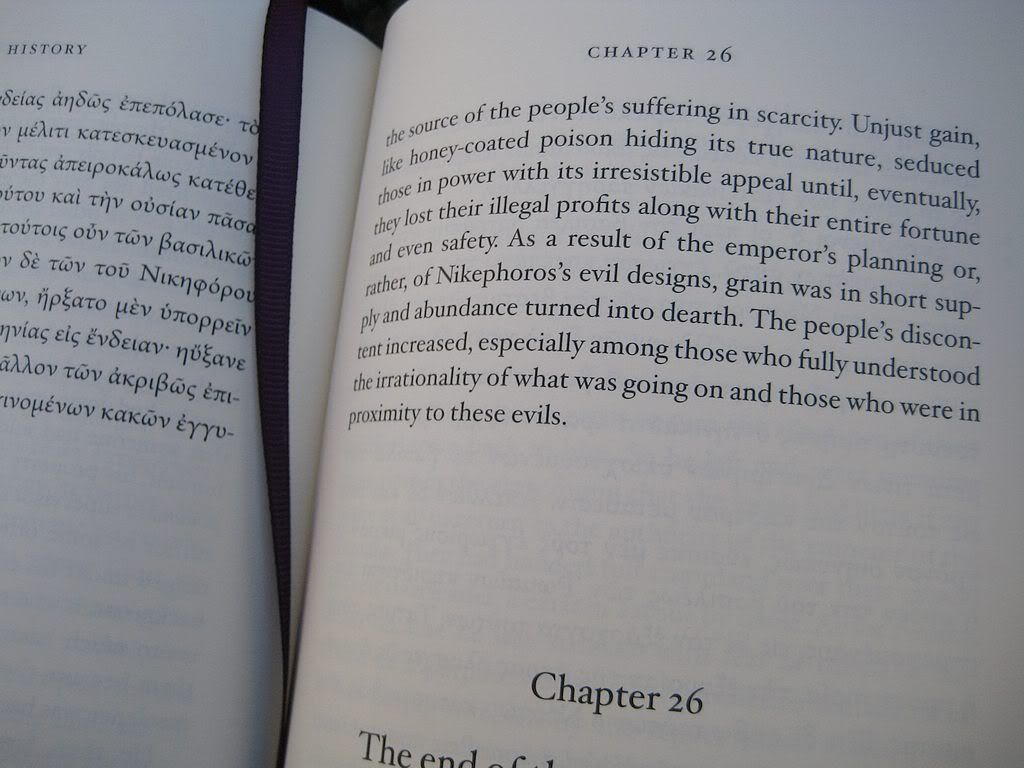
As in Anna Comnena's later Alexiad, much of the content concerns the extreme dangers in the eastern Themes, made all the more unsettling to read as
nomadic hoards of human effluent bring their savagery ever westward. Remarking on the devastation wrought in one passage, Attaleiates notes the distance markers as the only indication of what had once been Imperial territory. As witness to the empire's internal strife, power struggles, revolts and insurrections, he does not neglect the suffering of the ordinary populace, and lambasts the ruling classes for their pusillanimity;
"For we are pressed on all sides by the pangs of death, the Gothic and other most foul nations having prevailed over the entire east and west, preying on our simple mindedness and neglect, or, to speak more truthfully, on our impiety and madness, given that we rabidly fight against one another, our own countrymen, without restraint, showing contempt for death, but when it comes to wars with foreigners we are cowardly and unmanly, and appear to turn our backs to the enemy even before battle begins."
The ruling classes (with the prudent exception of the reigning emperor) are frequently criticised for their corruption and incompetence.
Somehow, in the intervening millennium, there has been no English translation of this work available. It comes as no surprise that Dumbarton Oaks is the publisher responsible for the first English edition, previous efforts including The Correspondence of Leo, Metropolitan of Synada and Syncellus, and Constantine Porphyrogenitos' De Administrando Imperio.
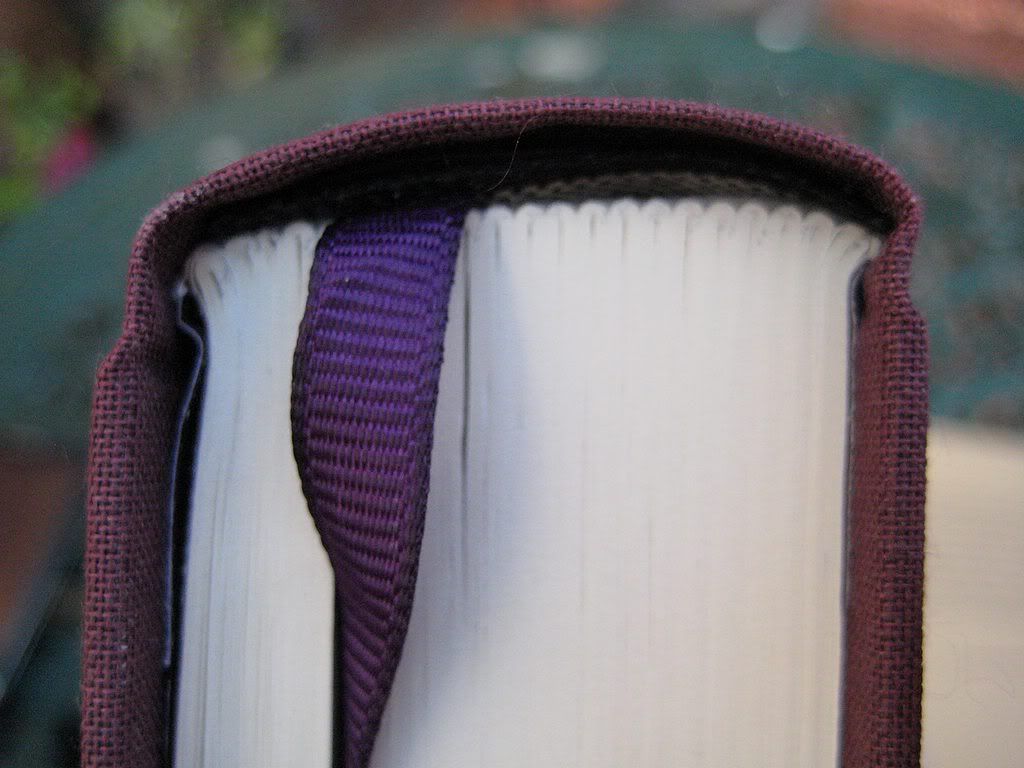
This binding ought to hold up well. Note the always handy place marker.
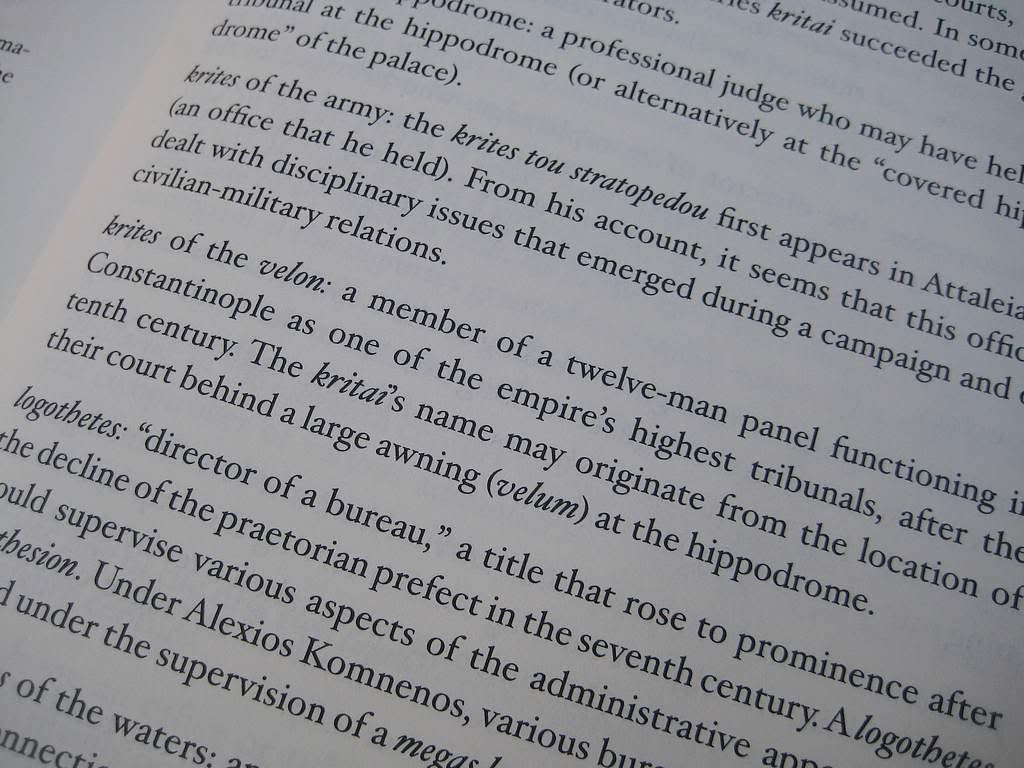
This new volume - which after a slight delay, arrived at my door in mid October - continues in the style of Dumbarton Oak's previous publications, with the original 11th Century Greek text and English translation on opposing pages, background information on the author, translation notes, a glossary of terms, and even maps. This is a sturdy and well made hardback, with stitched and glued folios. The increase in font size since the Administrando Imperio is very welcome, as is the addition of a handy stitched ribbon place marker.
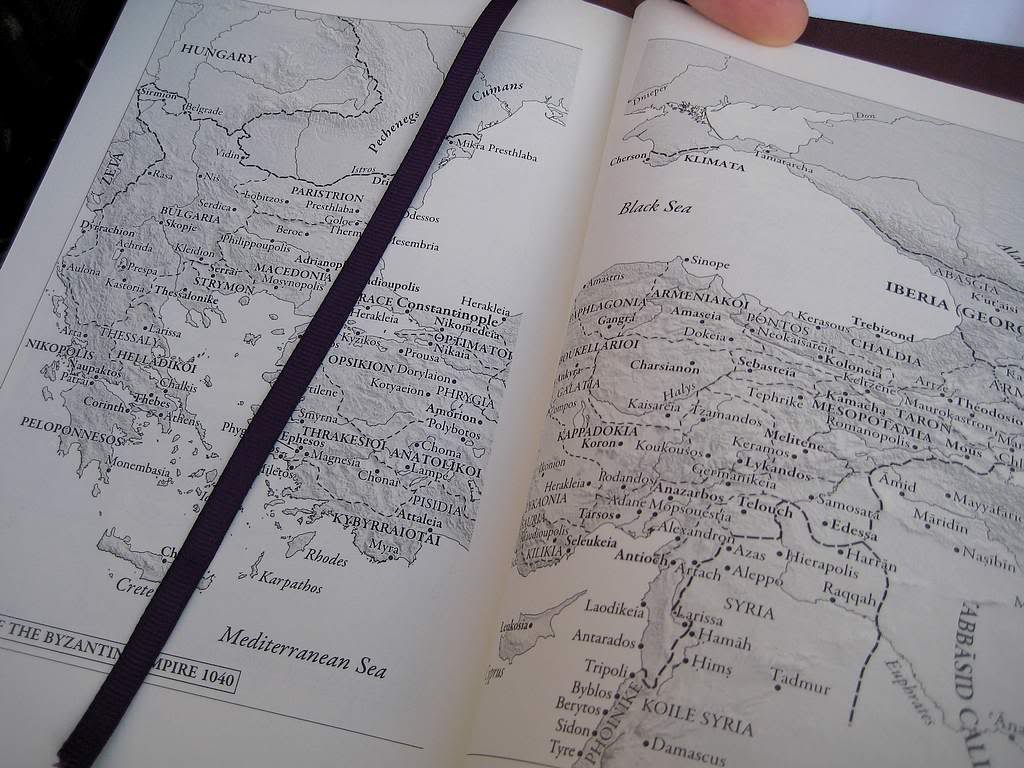
Several maps are included for ease of reference.
'Kouropalates' - not organisers of the Imperial exercise classes.
In The History, Dumbarton Oaks have made accessible yet another excellent and affordable tome. I'm thoroughly enjoying - even marvelling at - the chance to read Attaleiates' own words, and recommend it as essential reading to any right thinking amateur Byzantinologist.
No Thanks!
Blogger! Why do I have to fiddle with the HTML to place two photographs side by side, with word wrapped caption text for each? Contemporise, man!
YouTube, I do wish you had some sort of offline software available to reencode large files.
Installing the filler completes the vacumatic 616 build (though it's all about the journey, man). This takes about 5 minutes to do, then strictly 48 hours of resisting the urge to press that shiny plunger/ letting the sealant cure.
Foreground: A 616 Jumbo with the vacumatic filler installed.
Bringing together the filler and the pen was quite the conundrum for a while. As mentioned earlier, the 616's barrel lacks a vacumatic Parker's dedicated inner contours. To compound the issue, the cross section of the barrel is not quite circular, like a gibbous moon.
The 616's thick barrel wall makes a strong platform for the filler housing; its irregular circumference is less helpful.
In her first sea trials, this gave the filler big problems maintaining an airtight seal. Of course, with the slightest air gap, no vacuum could be generated. I puzzled over this for several evenings. Some sort of deformable gasket, or packing? Too rigid. Wraps of teflon tape around the top of the filler? Too fragile. Try to hone the cavity true? Too involved. The Ultragrey left over from changing the blasted Civic's rocker cover gasket? Quite messy, and too costly.
Sometimes epiphanies don't strike; with a shrug, I put all the bits in a ziplock baggie, all the photos in a folder, and didn't think about the project again for 5 months.
Highlighted: rubber ink sac and steel washer sealed to a 616's plastic barrel.
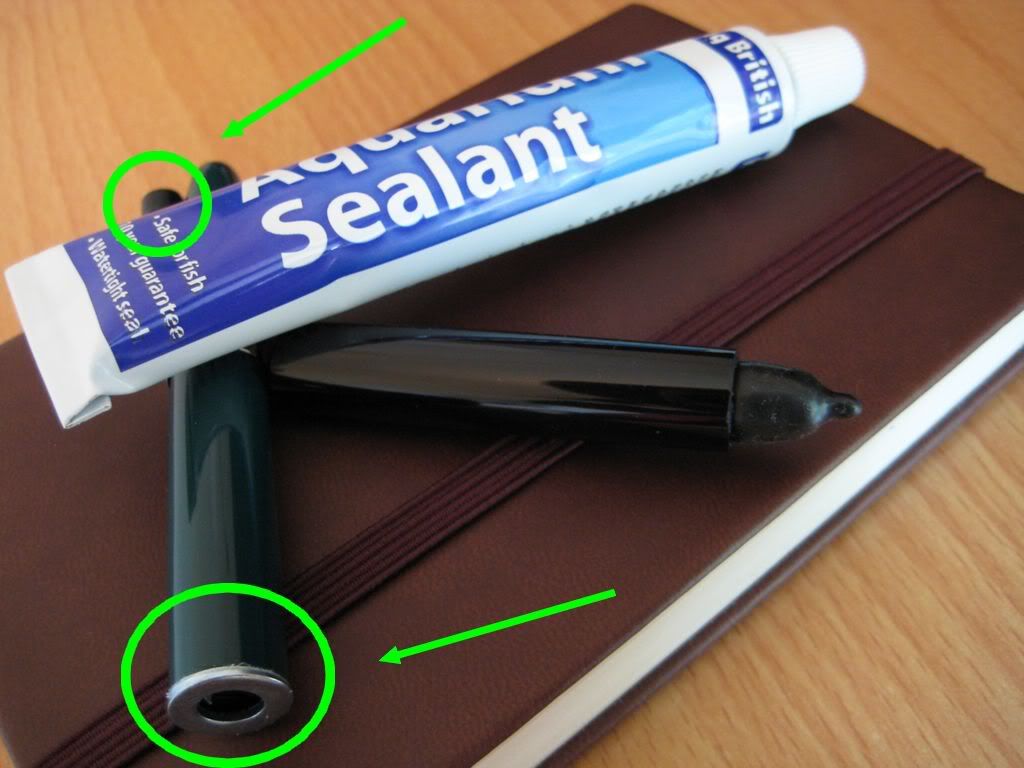
I won't bore you with this for too much longer; the answer was there all along, had I the insight to look for it - aquarium sealant. People have used it to plug up vents in eyedropper conversions for several years. I've no interest at all in eyedroppers, and my regrettable lack of curiosity almost killed off this vacumatic conversion.
Still, better late than never! I picked up some aquarium sealant from eBay, and was suitably impressed. It goes on with with the consistency of a thick grease, and cures to form a strong waterproof bond (as well it should to mount valves to fish tanks).
In a test of its capabilities, I used the sealant to stick an ink sac off-cut and steel washer to another 616 barrel. After 2 days, the steel washer took quite some effort to pull off, while the ink sac almost tore rather than separate from the plastic, despite being sealed to the barrel side on (like this 00).
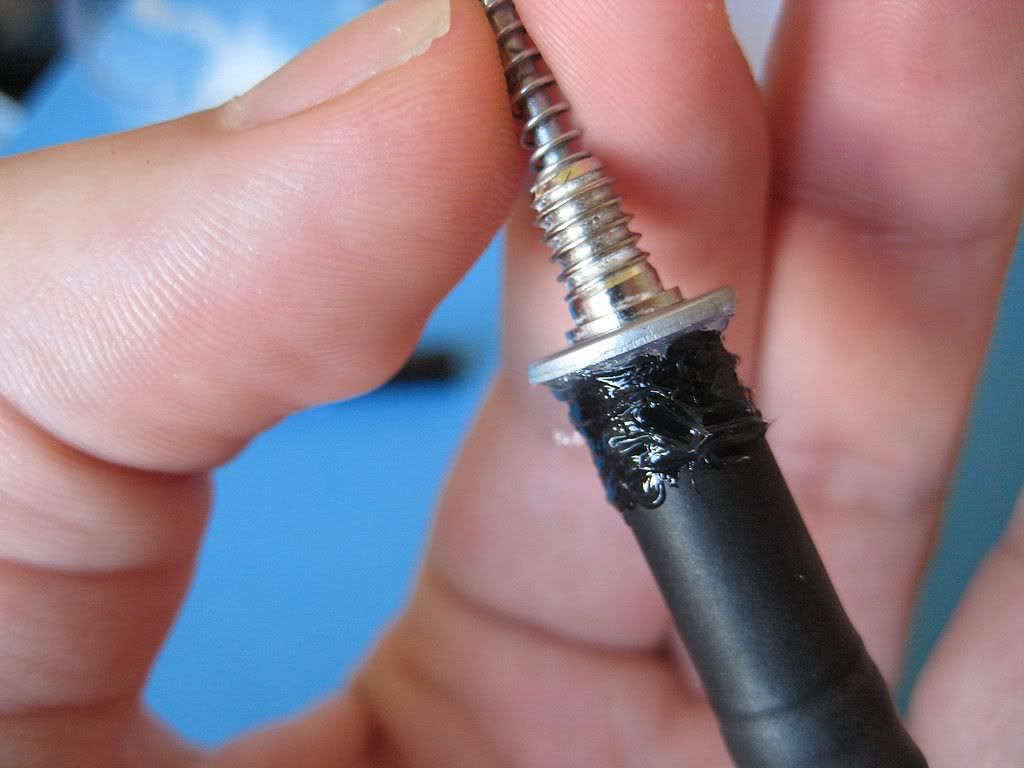
I found that the 48 hour dry time has its advantages. You don't have to rush during application, and any excess sealant can be wiped off well before it has a chance to set - even peeled off after the first few hours. I could afford to be very liberal with this stuff when mounting the filler -application was with the eye of a large needle. Notice the lack of talcum powder in the photo below. There's loads within the diaphragm, and none without, so as not to interfere with the sealant.
A thick layer of sealant, covering a fair length of the unflexing area of the diaphragm and steel washer for peace of mind.
Adapting the advice on the vacumatic tear down page at the Restorer's Art site, I then lubricated the barrel (rather than the diaphragm). This meant I could leave a decent sized clean & dry area at the top of the barrel for the sealant to adhere to. A cotton bud soaked in soapy water, inserted from the bottom of the barrel, performed this job.
Lubricating the barrel with soapy water helped the rubber diaphragm slide into the barrel rather than bind halfway up.
Here's the filler in place, before setting aside to allow the sealant to cure.
The filler shortly after installation, with the majority of excess sealant wiped away.
That's all, folks! Despite the delays, I had a blast visiting the many great sites on vacumatics, giving it a go, and eventually watching the bubbles form as the assembled pen began to fill. This aeromatic to vacumatic conversion is the last in this 3 part series of articles on Hero's 616 Jumbo, did you enjoy it?
Like conventional ink sacs, vacumatic diaphragms are supplied long, and need trimming to size. This is a very good thing, because this crudely self built vacumatic filler is nowhere near as compact as the optimised examples found in real Parkers. Consequently, the diaphragm needs to be kept longer - here's a photo with the trimmed diaphragm fitted to the filler, to show what I mean. Even at rest, the 616 filler takes up more barrel space than the ideal.
The 616's diaphragm is kept quite long, to allow for the length of the vacumatic filler. The green area of the x ray is supposed to represent the inverted portion of the diaphragm. Stop laughing at the back!
The correct length was figured out by hooking the diaphragm up to the pellet holder (turning it inside out like a sock on laundry day), then pressing the plunger. As it turned out, the diaphragm had about 5mm that it could safely lose without stretching the rubber at full extension.
About 5mm of diaphragm for the chop. The excess was used in the blind cap's construction.
To demonstrate the diaphragm's length, and the plunger's range of motion, here's a short YouTube clip (sorry about the unhelpful angle).
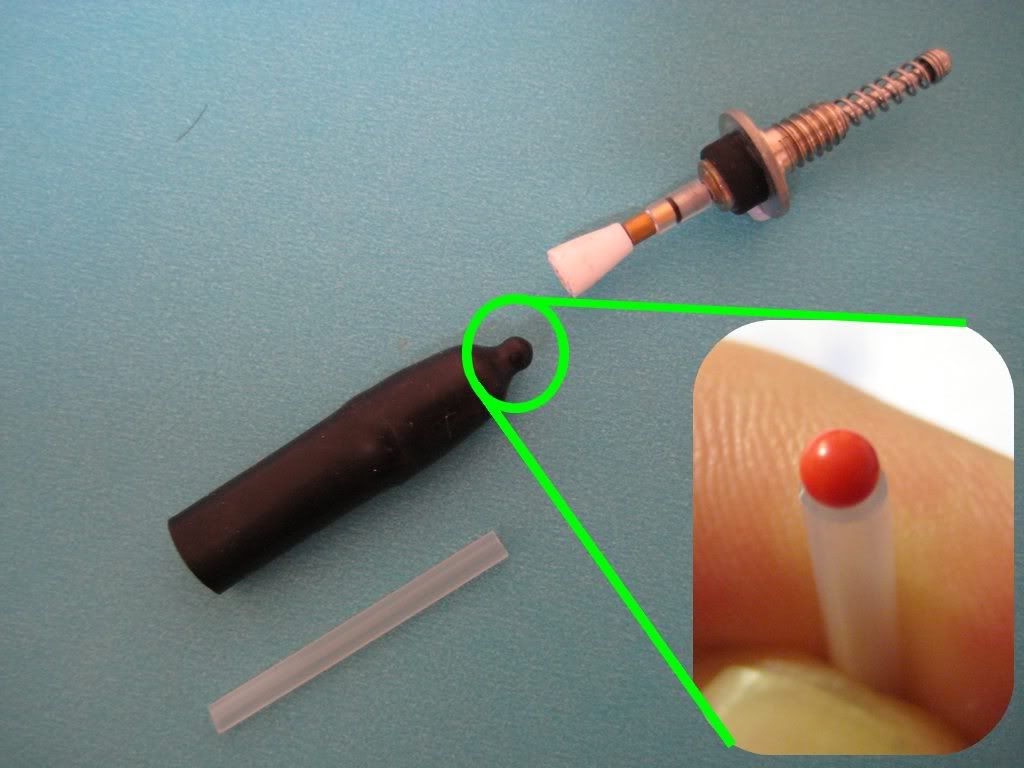
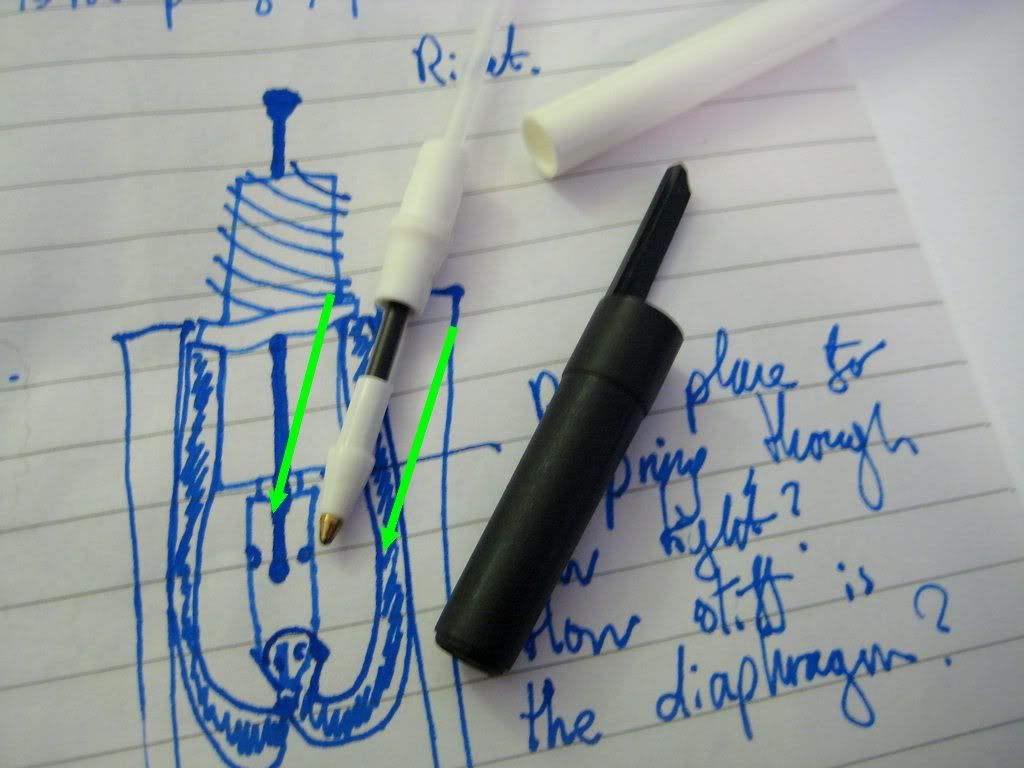
To fit the diaphragm to the filler, I stuck a length of ballpoint ink tube up its backside, to get the (red) pellet clicked firmly in the (white) pellet holder.
A length of the biro's ink tube can be used as a makeshift ramrod, pushing the tiny red pellet at the top of the diaphragm into the pellet holder.
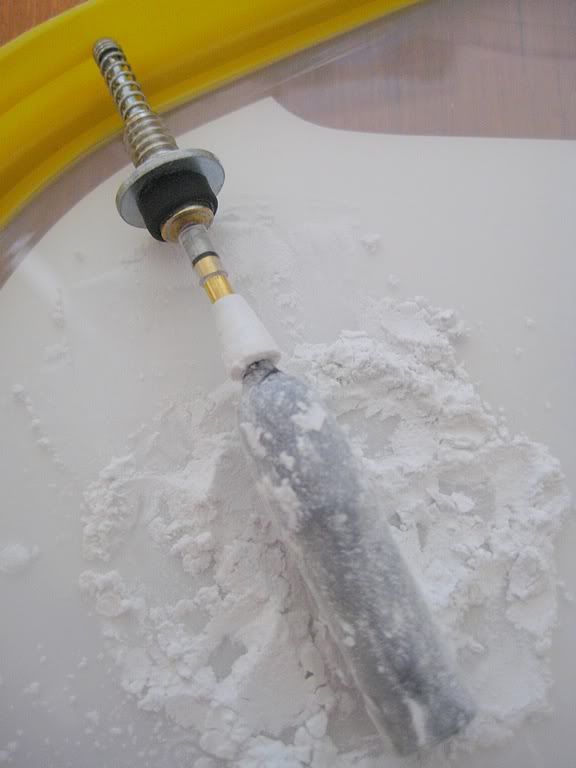
After attaching the diaphragm, I gave it a very generous dose of talc, to help convince the rubber to invert properly.
The diaphragm secured to the bottom of the plunger rod...
... and liberally powdered with talc.
It's a bit messy with so much talc involved, but I found the more talc used, the easier it was to invert the diaphragm. Here's the completed vacumatic filler with diaphragm installed, ready to be fitted to the Hero 616 in the final post of this series.
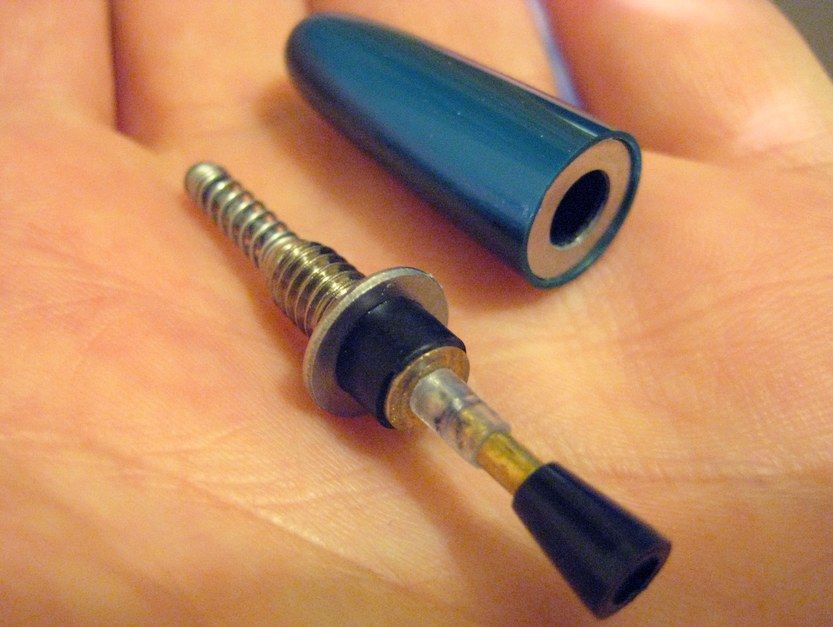
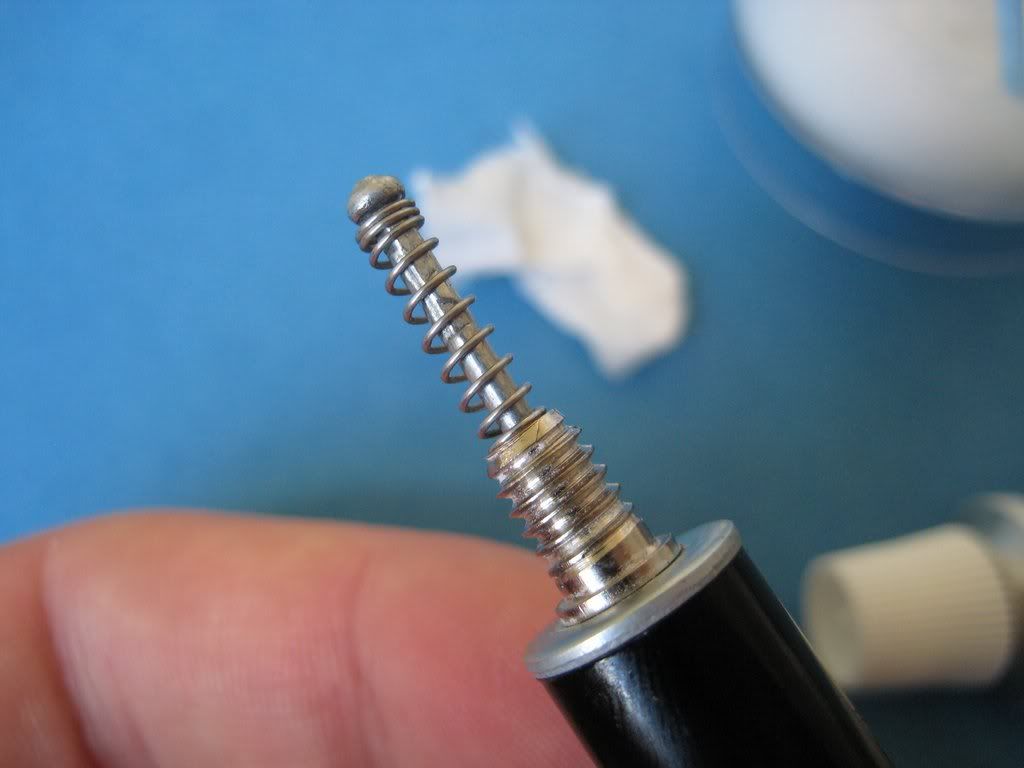
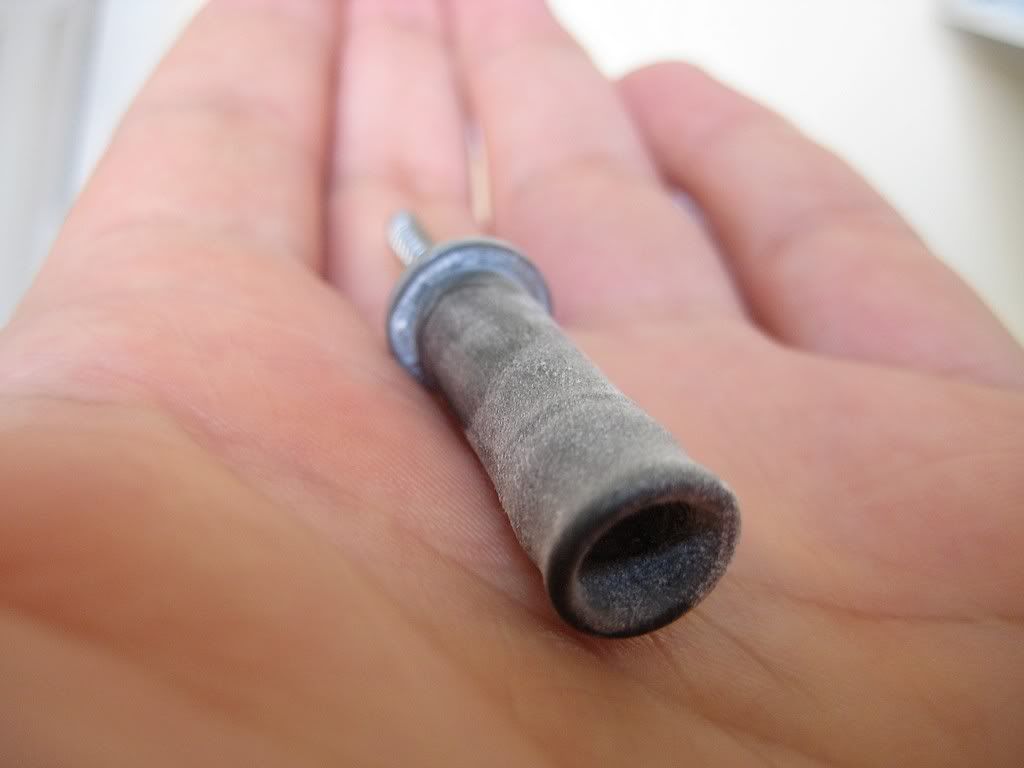
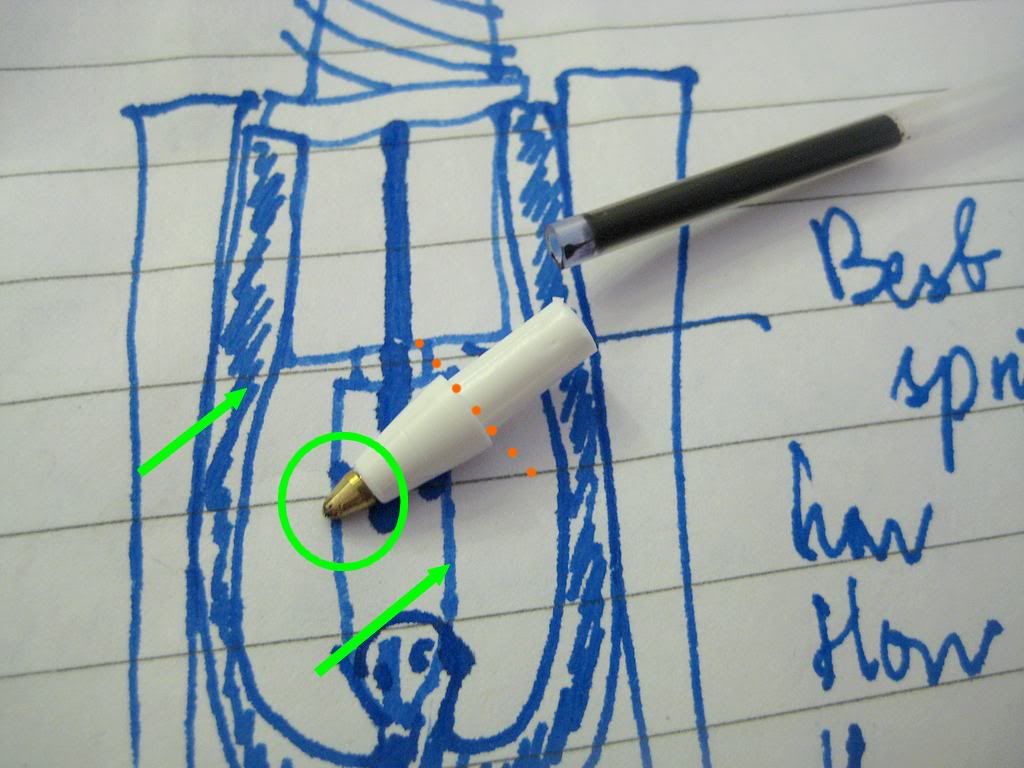
Below the filler housing - the protruding end of the plunger rod, clear tube connector, golden ballpoint tip, and pellet holder.
The Woods valve was the vital component of the vacumatic 616's filler housing, covered in my last post. The focus of this post is the plunger which moves within that housing. The plunger is just a spring loaded rod connected to a pellet holder, out of sight below the filler housing.
The plunger rod's job is to keep ahold of the rubber diaphragm within the barrel, and give it a good push and pull. A ballpoint pen makes very light work out of the real hurdle in making a lowly 616 vacumatic when it has no business being so; how to make this plunger rod grip the diaphragm.
I had read David Armstrong's excellent Haynes-style dismantling of a real Parker vacumatic filler unit with great interest, gaining a much clearer understanding of how this could be accomplished. In every vacumatic diaphragm, there is a small rigid pellet, housed in a wee pocket at the top. In a real Parker vacumatic, this rigid area gives the mechanism something to hold onto. A dedicated, precisely sized pellet holder glued to the bottom end of the plunger rod does the job.
The inspiration to look at ballpoints for this task came from an old FPN post of PenFisher's, on making spare pellet holders for use in genuine Parker vacumatic filler units. This involved cutting out a cross section from a tapered Papermate Writebros ballpoint pen. For my purposes, the British Red Cross freebie ballpoint's design makes it even easier still, as the only cut you need to make is across a straight ridge. It could have been made with this conversion in mind, it's that perfect (I like to think this was a purposeful subversion by some shadowy cabal of renegade designers). Here's a short video, showing a test of the pellet holder's strength. It actually compresses the plunger return spring before letting go of the diaphragm.
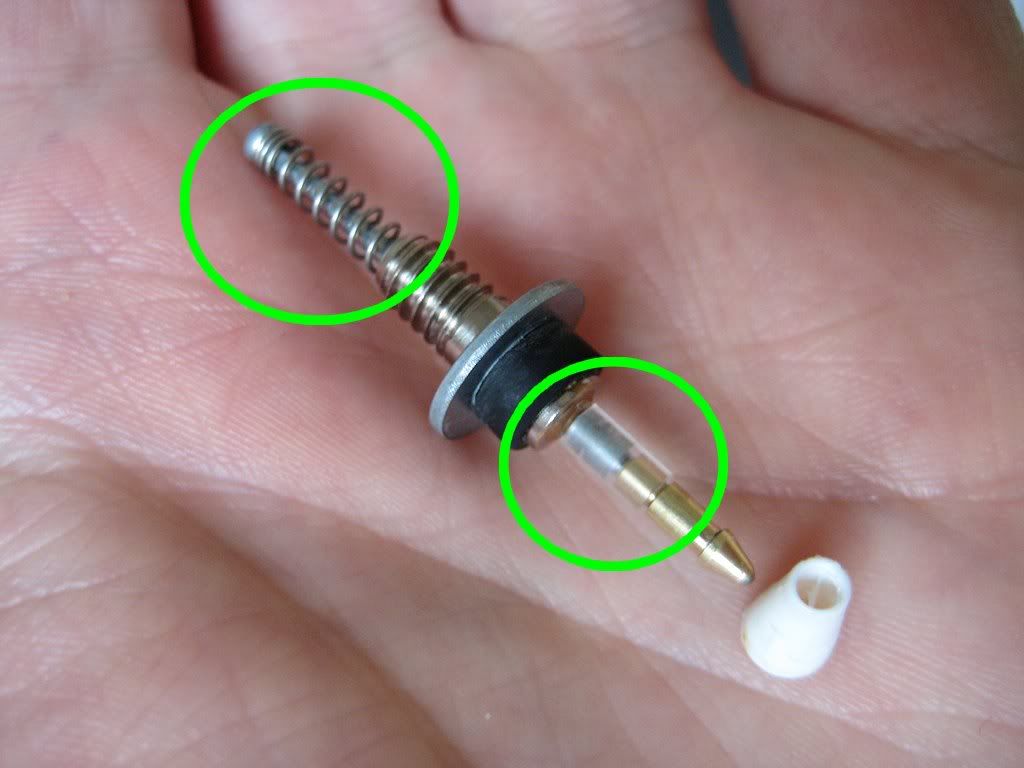
As all the parts here discussed came from the same ballpoint, they all snap together securely. The pellet holder clicks into the metal tip of the ballpoint, which clicks into a short length of the rigid ballpoint ink tube. When heated in boiling water, the tube softens enough to have the steel blind rivet tang driven into it. After cooling, they are so strongly connected that it takes two sets of pliers to separate them!
To break that fevered gibbering down into a coherent build sequence, I'll start with the ballpoint pen in hand.
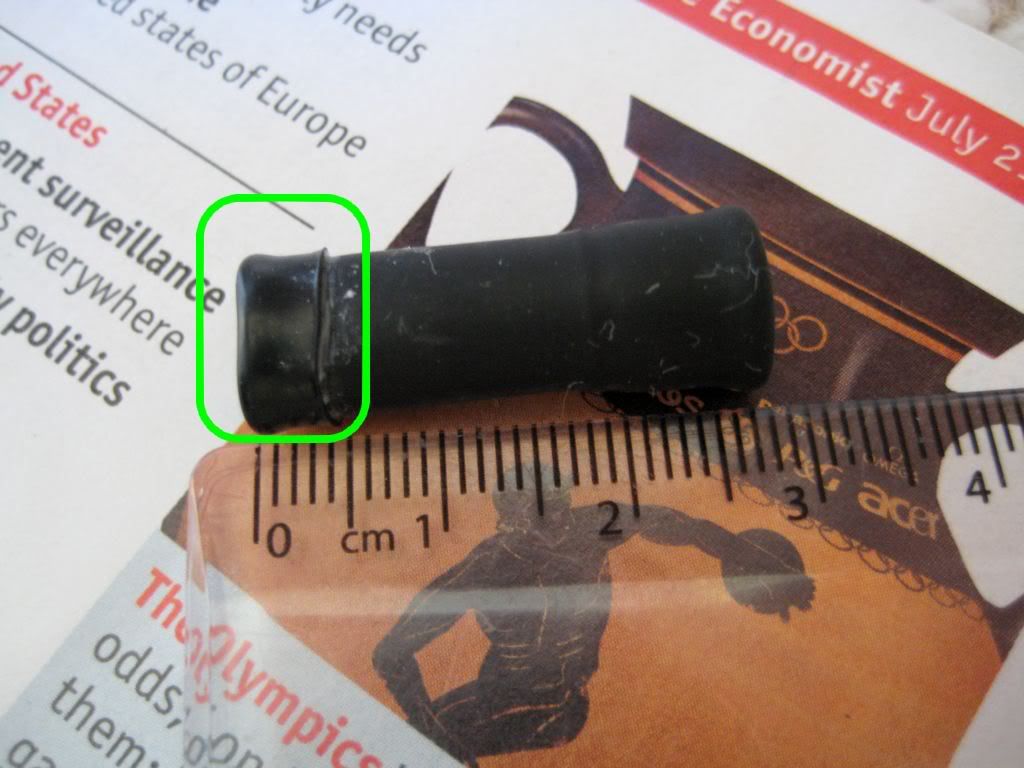
A mailshot British Red Cross ballpoint pen. The area highlighted in green became the pellet holder.
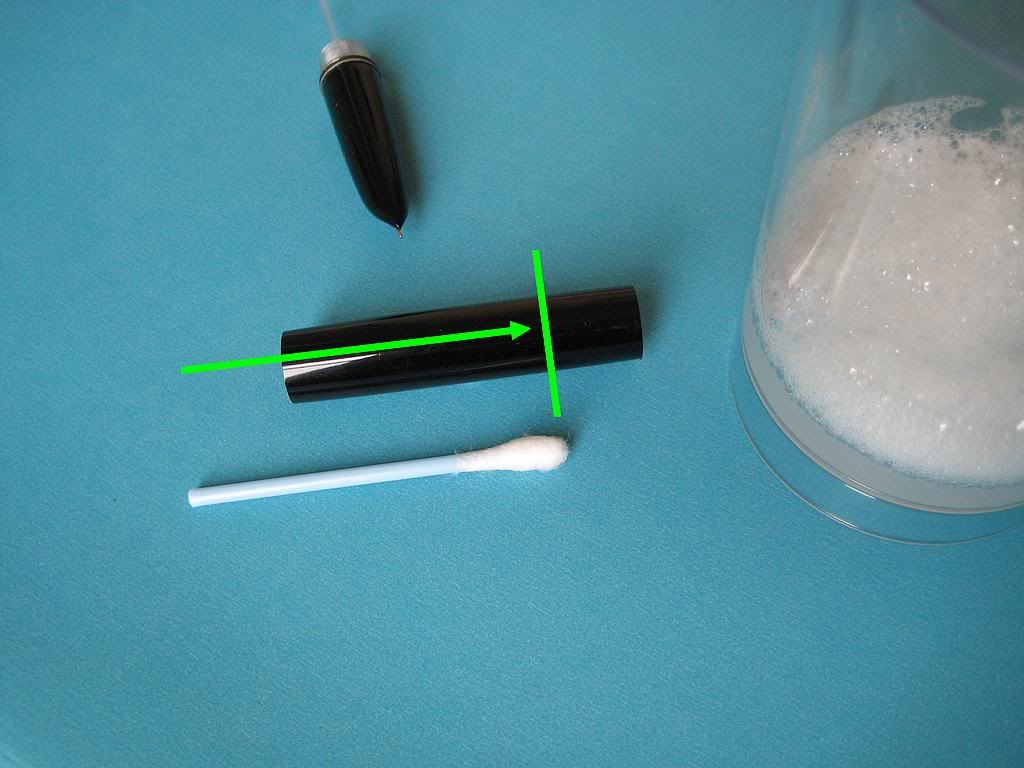
The Staedleresque design is unusual, in that besides the barrel, there are two further plastic pieces. They're a simple friction fit in the barrel, and can be pulled right out;
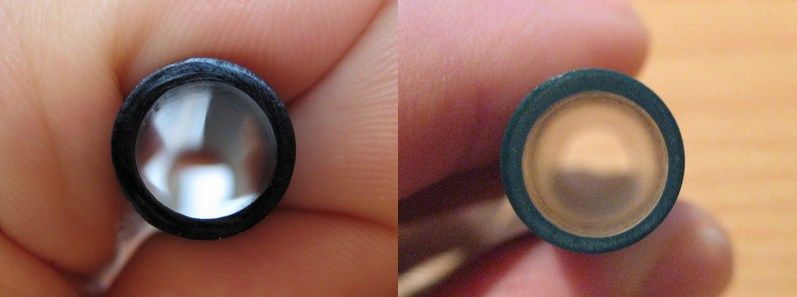
Pulling the ballpoint pen apart. Notice how little ink the tube is actually filled with. Good to see the Red Cross aren't wasting too much cash on this sort of thing.
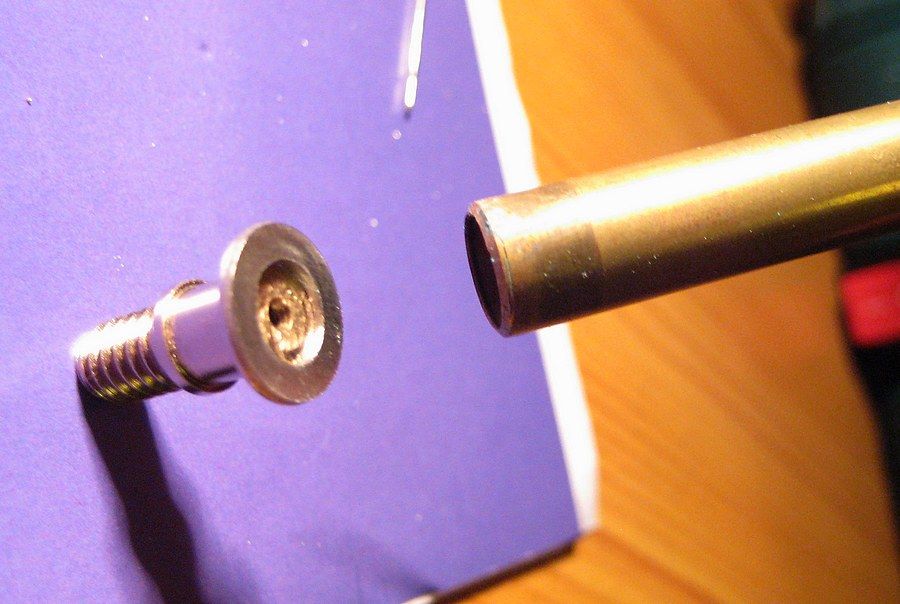
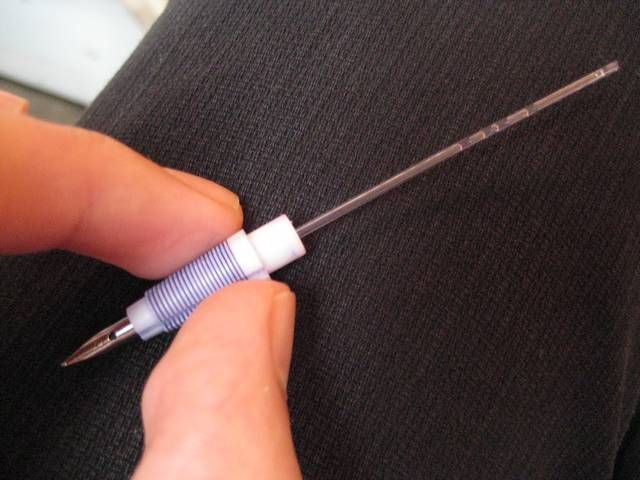
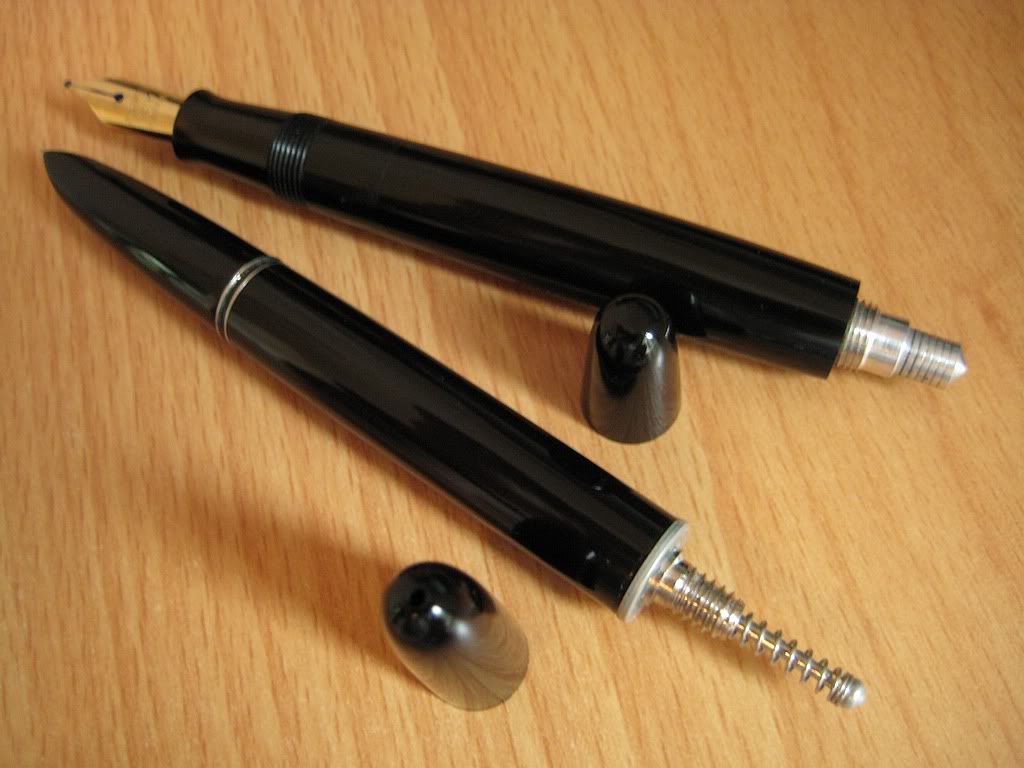
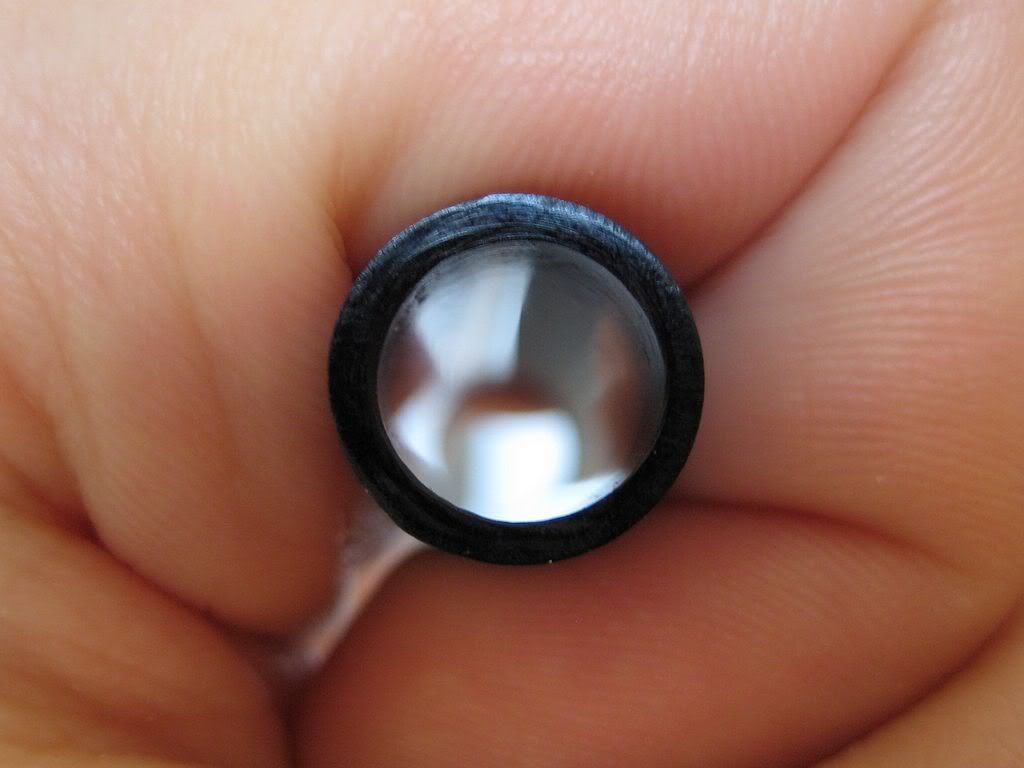
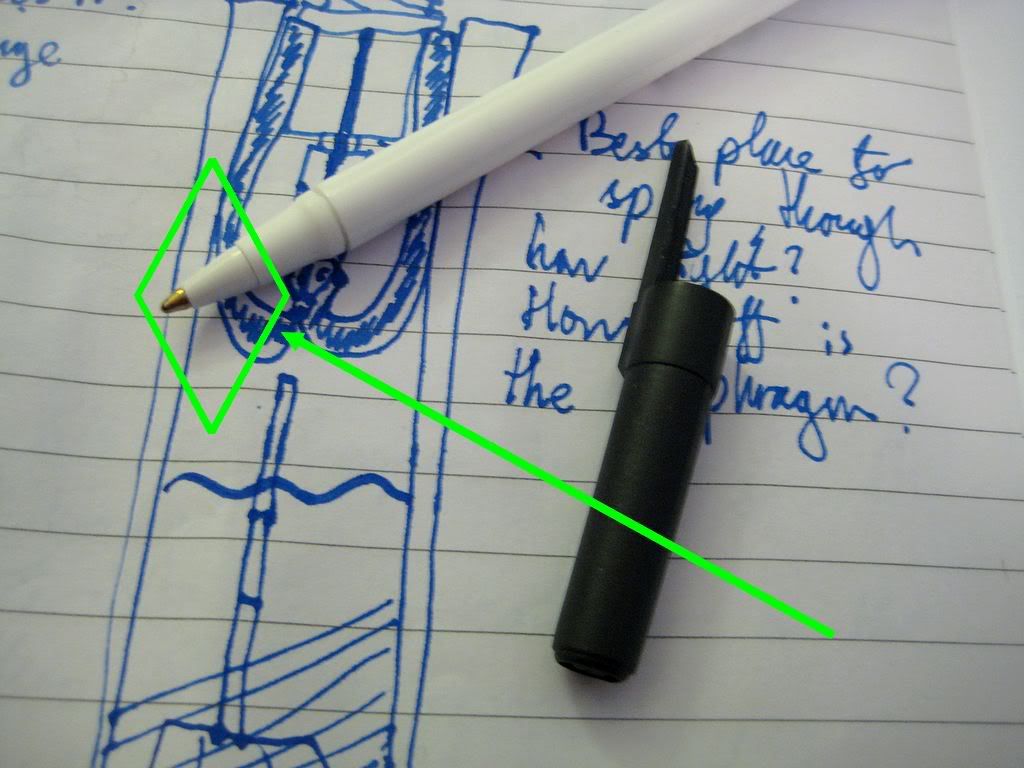
The golden metal ballpoint tip needs to be taken out, and reinstalled the other way around - as shown in this post's first photograph. It is easiest to push it against a hard surface, straight into the plastic surround - it will drop out the other end. Then cut off the end off the plastic piece, straight across the ridge highlighted in orange.
To release the tip, press it into the plastic surround.
Reinsert the tip the opposite way around - it will still click into place. Then cut along the orange line to discard the excess plastic.
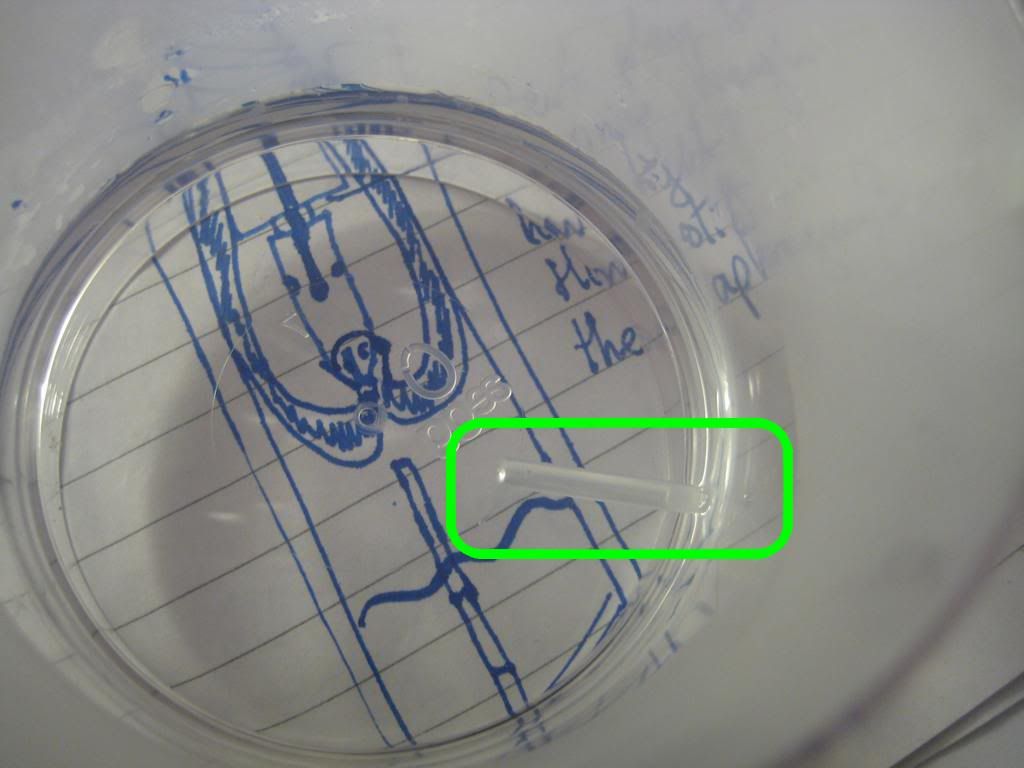
All that remains after the pellet holder is made is to hook it up to the blind rivet tang derived plunger rod, using a piece of the ballpoint's ink tube. On the pellet holder end, this just clicks into place; on the plunger rod end, bonding is marginally more involved.
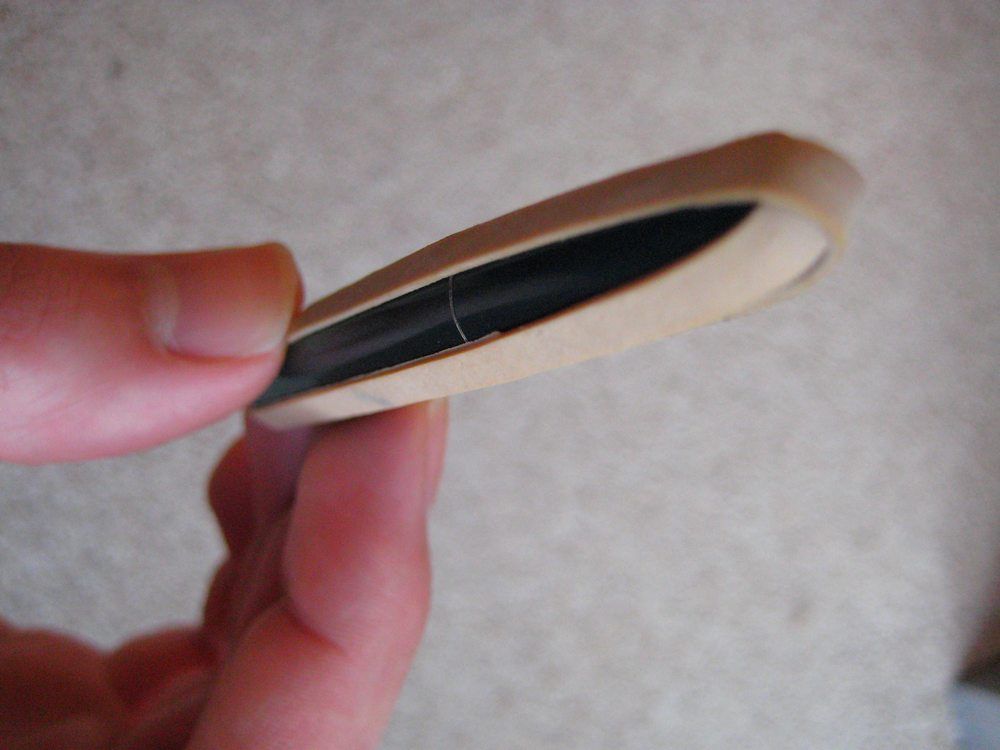
Heating a length of the ballpoint's ink tube (highlighted) in boiling water.
First of all, the rod wants shortening, to minimise wasted barrel space. Secondly, grinding the end to a point greatly helps drive the steel plunger rod into the clear plastic tube.
The exposed end of the steel plunger rod, ready to be driven into the clear plastic tube.
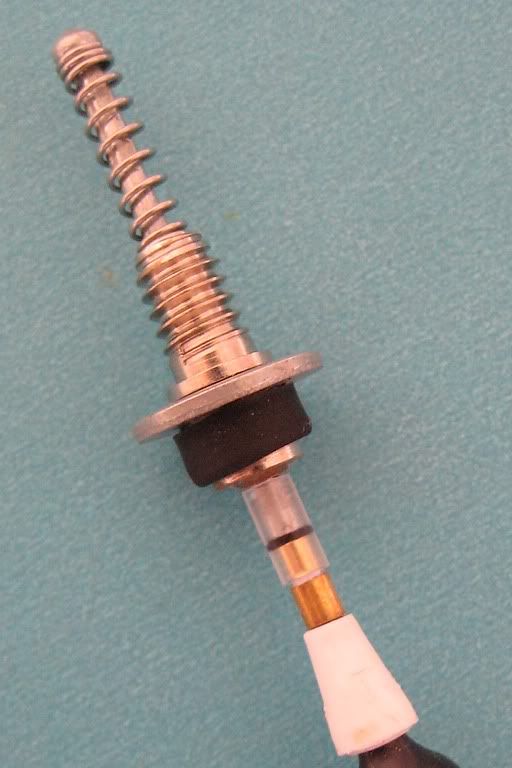
It's best to put off attaching the pellet holder until after the plunger rod is forced into the plastic tube, to avoid stressing it unnecessarily. Both the exposed end of the plunger rod and the clear connecting tube were cut as short as possible - after all, the less barrel space the filler takes up, the greater the pen's ink capacity.
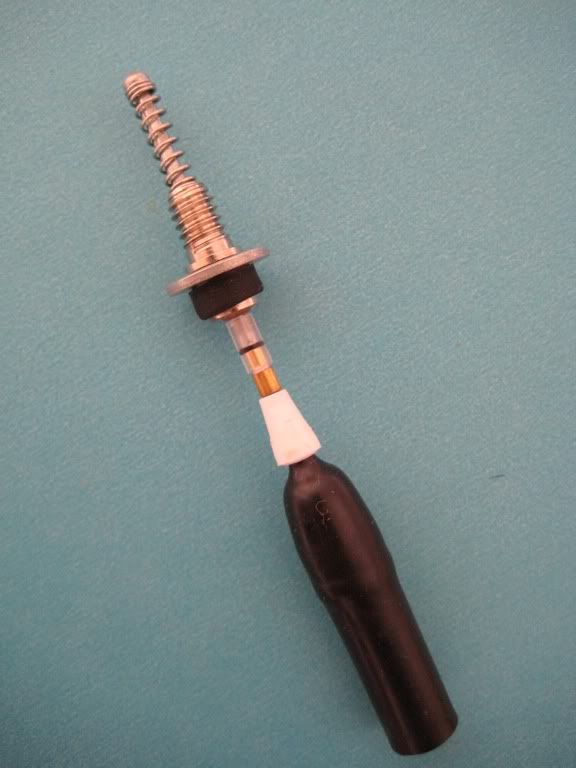
The plunger rod secured to the ink tube, which acts as a physical stop as well as a connection to the pellet holder.
With the pellet holder clicked on, that's all there is to the filler unit. In the next post, the diaphragm goes in.
The complete 616 Jumbo vacumatic filler, ready for its diaphragm.