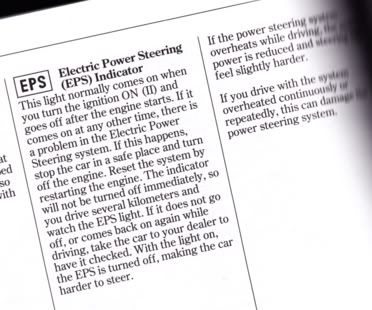
 EPS steering. Electric Power Steering. I admit never having heard of it before I met the Civic. Unlike conventional, reliable, relatively maintenance free power steering systems, or half conventional, half electric systems, EPS steering involves no pump, no hydraulic fluid, and
 Instead, a torque sensor tells an electric motor to turn the wheels when the steering wheel is used. The idea is improved fuel economy, as the steering is not a constant drain on the engine's power.
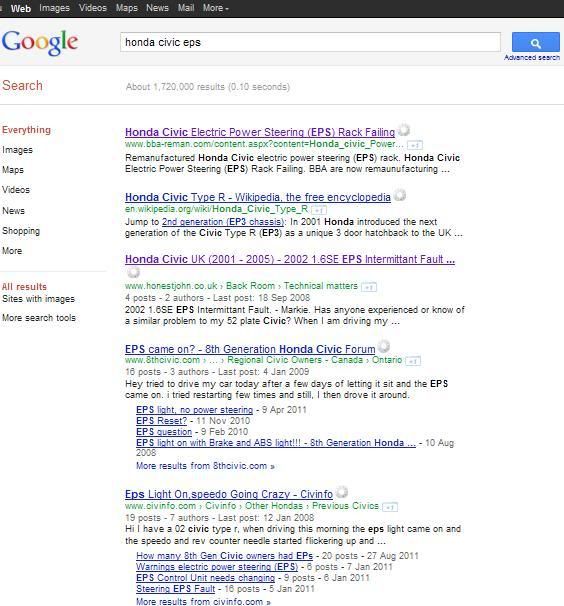
Personally, I think Honda's EPS feels unnatural. From personal experience (before following excellent advice to spray a little lubricant in the torque sensor area), it can be notchy and reluctant to return to centre. At the time of writing, an innocuous google search for "honda civic eps" brings up more complaint than high praise - click the thumbnail to zoom in.
Poor lubrication can result in noise in the EPS rack when steering, stress on the electric motor, wear, and big headaches and bills. There are guides to replacing the rack once it's worn, but I'm not comfortable extracting the entire rack from the engine bay, or resetting electronics or tracking. I'd rather regrease the EPS in situ as much as possible while my steering is still fine, as a preventative measure.
 |
| © Copyright Colin Smith and licensed for reuse under this Creative Commons Licence. |
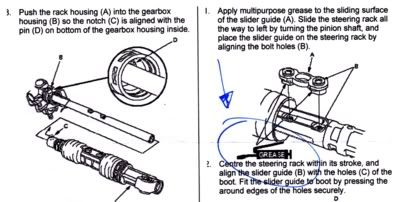
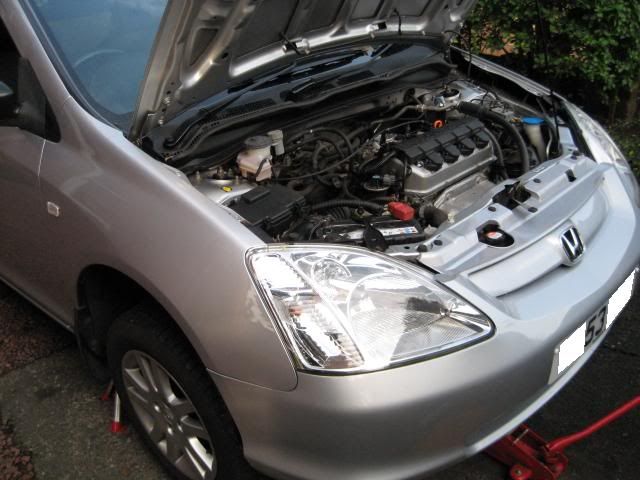
To give a short overview of what this involved, I lubricated as much of the rack sliding surface as possible by first pulling back the rubber accordion gaiters on either side of the EPS slider, and shoving grease in there. To get access to the rubber gaiters, I first removed the resonator box and airbox from the engine bay; to pull back the rubber gaiters, their steel retaining clips needed to be cut off.
Tools needed:
- an 8mm socket (for removing the airbox).
- a 10mm socket (for removing the resonator box and airbox).
- socket set extender (for an awkwardly placed resonator box bolt).
- axle stands (for raising the wheels off the ground; moving the steering wheel side to side helped with distributing the grease evenly).
- a small set of cutters, to remove the original retaining clips (bellows bands).
- a small crimping tool (to fit new bellows bands to the rubber gaiters).
- A new driver's side bellows band ("Band A"), Honda part number 53449S5AJ01.
- A new passenger's side bellows band ("Band B"), Honda part number 53448S5AJ01. This has a larger diameter than the driver's side. £8 for the pair at a dealership; why so expensive? More on these bands below.
- General purpose grease, despite the rubber gaiters. Honda make a dedicated power steering grease - part number 08C35-B0534L - but the shop manual specifies normal multipurpose grease during overhaul of the EPS rack:
I found it a great help to have the front wheels off the ground, so that they could be easily steered with the engine off:
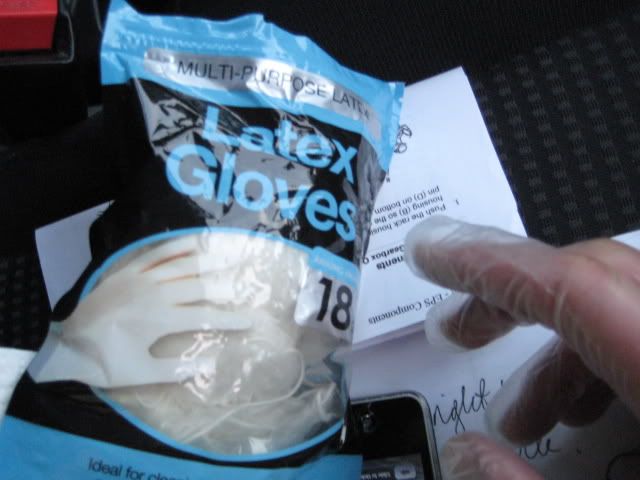
Attempt nothing without gloves!
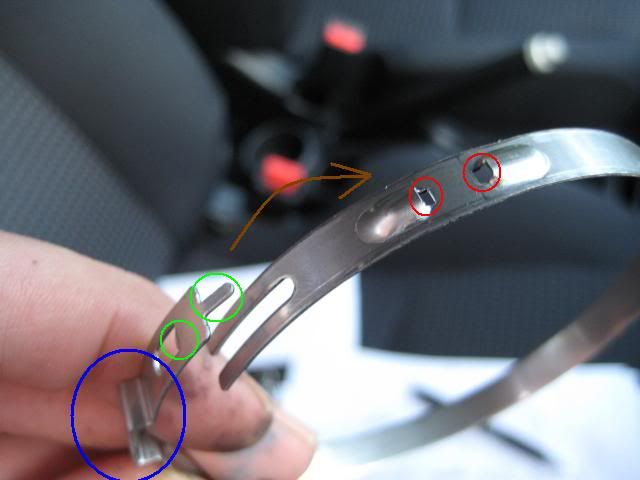
I've never come across these "bellows bands" before. Judging by the old ones, after fitting, the only way to remove them is to cut them off, so they are single-use. The raised area seems designed to prevent you cutting into the rubber gaiter by accident. When fitting the new bellows bands, I crimped the raised area in the same fashion as the old ones had been; this tightens the band securely.
In the photo below, the tabs circled in green slot into the holes circled in red. Then the raised area, circled in blue, is crimped tight. To later remove, the raised area is cut, releasing the band.
Following this introduction,I've split the EPS regrease photographs into stages:
- Removing the resonator box (only four 10mm bolts to unscrew)
- Removing the airbox (only two captive 10mm bolts to loosen, a hidden 8mm bolt to loosen, and an electrical socket to unplug)
- Regreasing the rack sliding surfaces at either side of the EPS slider guide
- Reassembly.
See you in the next one, have a good time.
Thanks for the article. The clips are re-useable, however you need a special tool which is not too expensive. The clip type does have a name, but I can't think of it right now. However with the correct tool they're really easy to get on and off.
ReplyDeleteI too have this problem on my 2003 civic. I have tried replacing the left hand side bush (opposite side of the electric motor) with a Teflon machines bush. It was OK for about 6 months then it came back again. But not as bad as it used to.
ReplyDeleteThank you very much for your comment. This is highly interesting. Any further details? Was this possible with the rack in place, or did you remove it from the car first?
DeleteThank you very mutch. I have a silent and soft steering wheel afther greasing. Before the greasing i had a very pesky creak noise. Thank again.
ReplyDeletelast word is "thans again." :)
DeleteI need to change my slider bushing can this same process function as a guideline as to doing this?
DeleteContact: smahabir2802@gmail.com
I need to change my slider bushing can this same process function as a guideline as to doing this?
DeleteContact: smahabir2802@gmail.com
Hi. Is there a possibility you can repair the links to the photos, please? Looks a really helpful article. Thank you.
ReplyDeleteHi ray, unfortunately it's not a technical issue, rather photobucket's change of policy that's hit the headlines over the past couple of months. They now want £400 a year, which isn't going to happen.
DeleteJust thought I'd say I love your guides. I would also very much appreciate it if the photos could be reuploaded - bookmarked this a few months back, planning on getting round to it. Perhaps try a different host site such as imgur?
DeleteThanks
Pinhole in each gaiter, half can of spray grease injected through pinholes (bike chain lube is v good), then patch pinholes (probably unnecessary - it's not a pressure system) with tube repair glue. Airboxes removed as per this blog. Total time 45 minutes, cost (in Poland) less than 50zloty (12 euro). :)
ReplyDeleteCar Parts Company
ReplyDeleteToyota Mira Car Parts In Pakistan
Daihatsu Move Car Parts In Pakistan
Honda Civic Car Parts In Pakistan
Honda Life Car Parts In Pakistan
Honda N-One Car Parts In Pakistan
Honda N-Wagon Car Parts In Pakistan
Honda Vezel Car Parts In Pakistan
Honda BRV Car Parts In Pakistan
Respect and that i have a nifty provide: What Renovation Expenses Are Tax Deductible house renos before and after
ReplyDeleteGreat insights! At Kwik Kar Auto Dallas, we often see that many BMW owners overlook small warning signs until they become bigger problems. Understanding the BMW coolant leak repair cost and its symptoms is crucial to prevent costly repairs. Regular car maintenance and timely auto repair services at a trusted auto repair shop can extend the life of your vehicle. Whether it’s vehicle repair, automotive repair services, or general car repair and maintenance, staying proactive helps avoid surprises. For anyone concerned about their BMW’s cooling system, knowing the bmw coolant leak repair cost upfront ensures informed decisions and smoother auto care experiences. Reliable car repair workshops and vehicle repair shops can make all the difference in maintaining performance and safety.
ReplyDeleteGreat insights on the auto greasing system! This technology truly makes a big difference in improving machine efficiency and reducing manual maintenance efforts. The way it ensures precise and timely lubrication helps extend equipment life and minimize downtime. It’s definitely a smart investment for industries looking to boost productivity and reduce operational costs. Thanks for sharing such valuable information!
ReplyDelete